Manage Backups
Backups contain bucket data. Backups can be taken on-demand or use a configurable automatic schedule.
Use the procedures on this page to create on-demand backups, schedule automatic backups, and manage those backups. To learn more about how backups work in Couchbase Capella, see Backup and Restore Cluster Data.
View and Manage Backups
|
Permissions Required
To view and manage backups in the Capella UI, the following permissions are required:
|
Accessing Cluster Backups in the Capella UI
Backups can be accessed under a cluster’s Backups tab.
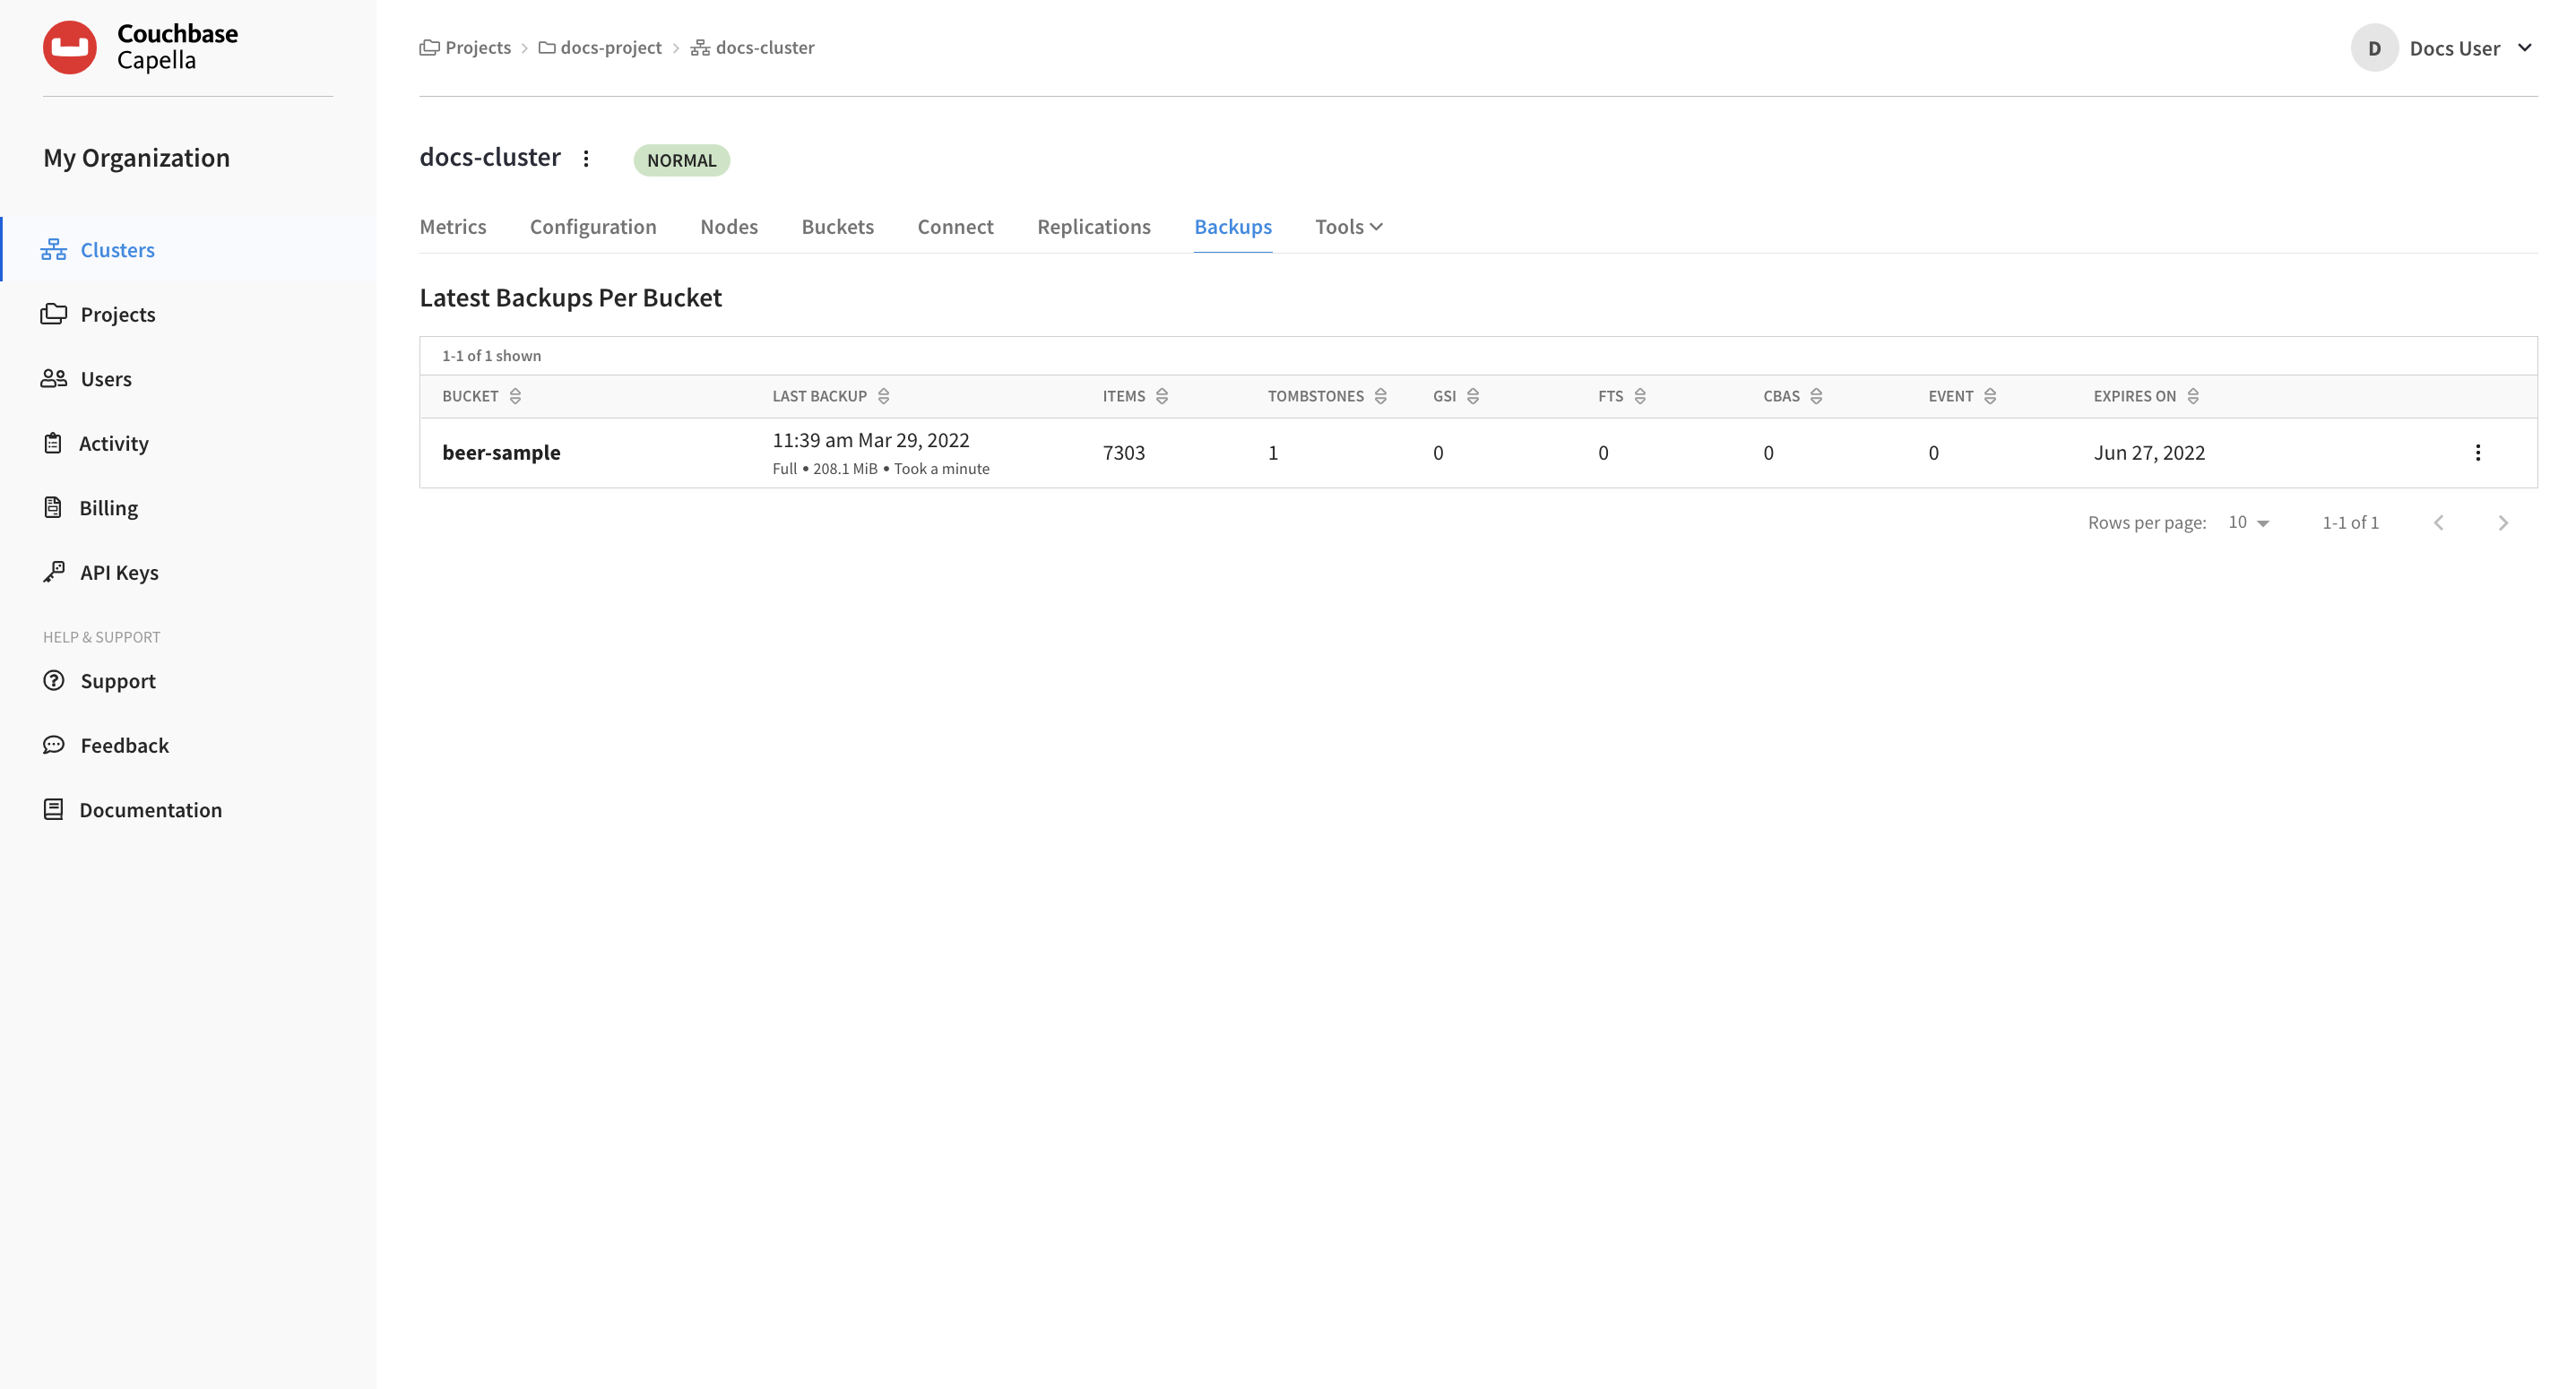
Backup Summary
A cluster’s Backups tab shows a summary of the latest backup per bucket that exist for the cluster. The summary is in a table format, with sortable columns and a row for each bucket.
The following information is shown for the most recent backup of each bucket with backups:
| Field | Description |
|---|---|
Bucket |
The name of the bucket with backups. |
Last Backup |
The last time there was a backup of the bucket, and information about the backup type, the backup size, and how long it took. |
Items |
The number of items that are included in the backup. |
Tombstones |
The number of tombstones — records for removed items — that are included in the backup. This number includes tombstones for deleted documents and any dropped collections. |
GSI |
The number of Global Secondary Indexes (GSI) included in the backup. |
FTS |
The number of Full Test Search (FTS) indexes included in the backup. |
CBAS |
The number of indexes for the Couchbase Analytics Service (CBAS) included in the backup. |
Event |
The number of eventing functions included in the backup. |
Expires On |
The date that the backup expires. |
Configure Scheduled Backups
You can configure scheduled backups for buckets at any time. Once you set a backup schedule, the bucket will automatically backup the bucket depending on the chosen schedule. When creating a bucket, the default setting is the Weekly Schedule. Other options include the Daily Schedule or No Schedule.
It’s recommended that you change each bucket’s Backup Schedule according to your Recovery Time Objective (RTO) and Recovery Point Objective (RPO). For example, production clusters and their included buckets may require a much smaller backup window and a much longer backup retention period than buckets in development clusters.
-
Go to the cluster’s Buckets tab.
-
Go to the Clusters tab in the main navigation.
-
Find and click on the cluster on which you want to configure automatic backups.
This action opens the cluster with its Metrics tab selected.
-
Click the Buckets tab.
-
-
On the far right side of the bucket you are working with, click More options () > Settings:
This action opens the bucket’s fly-out menu.
-
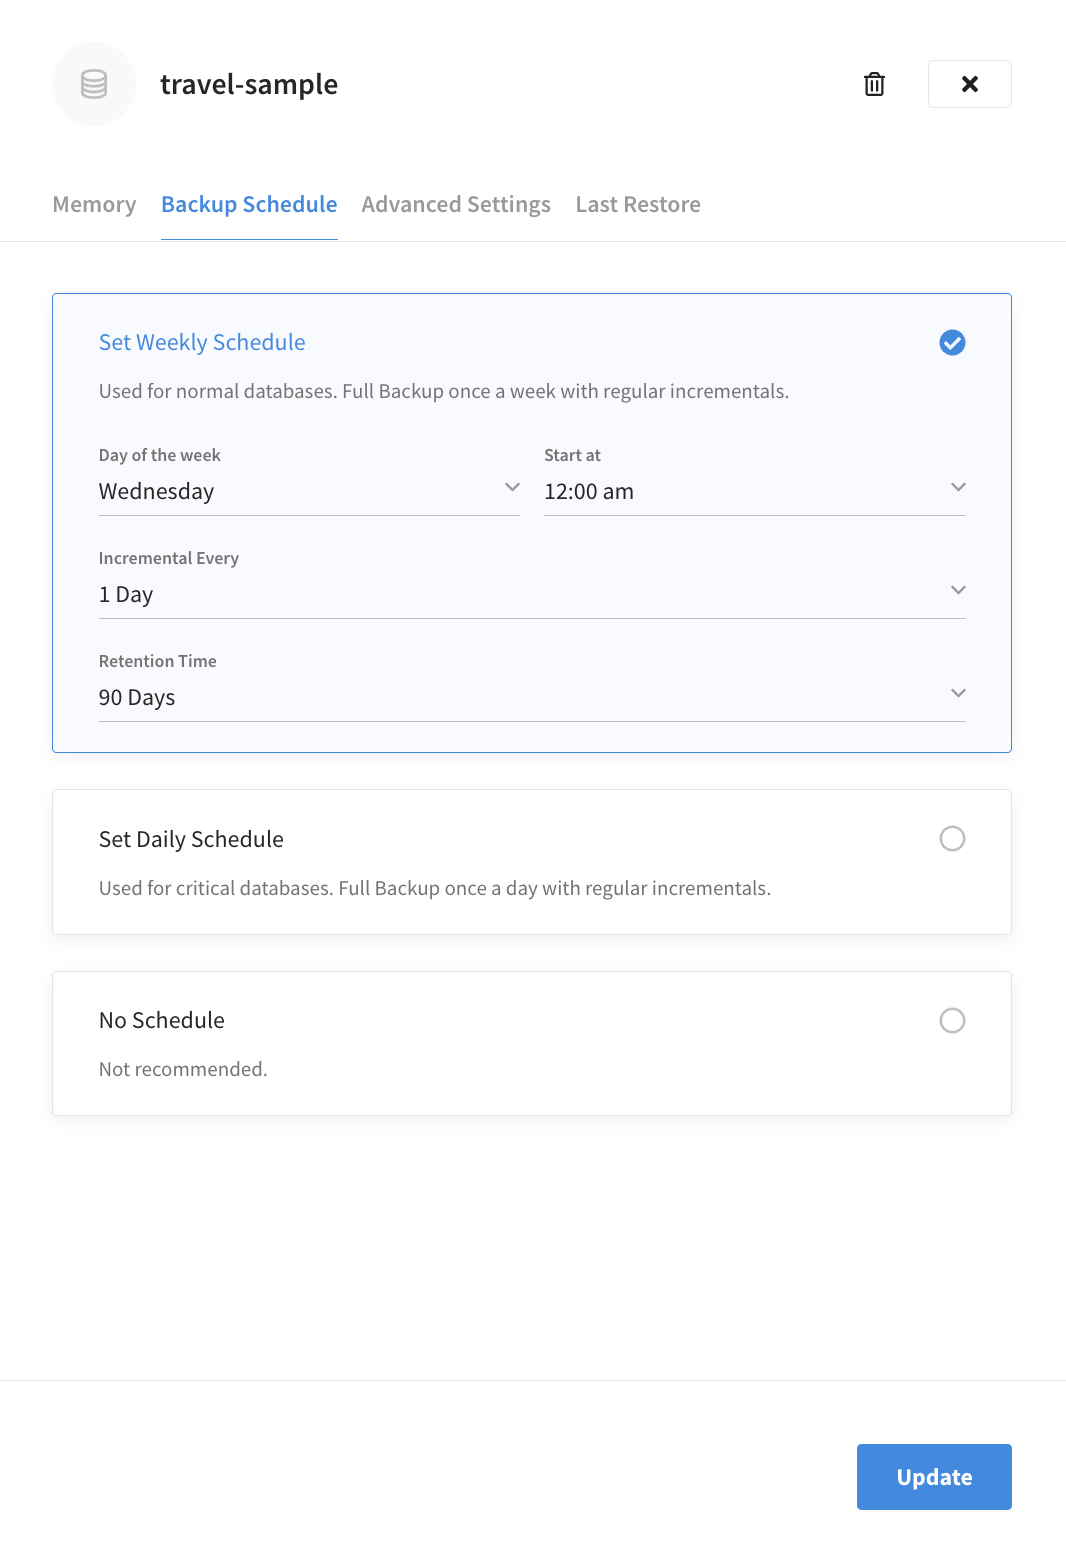
Click the Backup Schedule tab.
-
Choose the Backup Schedule for the bucket.
-
Choose between a Weekly Schedule or Daily Schedule according to the relative importance of the workload and data.
The No Backup option is not recommended for production clusters. It is intended only for development clusters or similar situations. -
(Weekly Schedule only) Set the Day of the week to when you want the full backup to be taken. The default value is
Sunday. -
Set the Start at time of day for the full backup to be taken.
Preferably, this should be a time when your application is not making heavy use of Capella unless you have chosen a VM with more capacity than you are likely to need.
This setting uses your local time zone. You can verify the timezone used by your Couchbase Capella account by reviewing your account preferences. -
Set the Incremental Every setting to configure the frequency for incremental backups.
Depending on the schedule you have chosen, this setting can range from
4 Hoursto1 Day.If you change the Start at time, the next Incremental backup may occur at a different time than you might expect. This is because the Incremental Value is calculated backward from the configured Start at time.
For example, let’s say Incremental Every is currently set to
8 hours, and Start at is set to4:00 am. If the current time is 9:00 pm, you would see that an Incremental backup was taken at 8:00 pm (an eight-hour interval backward from 4:00 am). If you were to then change the Start at to6:00 am, you would see another Incremental backup taken at 10:00 pm — just two hours after the last backup. This new backup occurs at this time because the eight-hour backup interval was recalculated back from the new6:00 amIncremental Every value to 10:00 pm. -
Set the Retention Time so that it is in line with your data retention needs and practices.
The amount of time each backup is preserved can range from
30 Daysto5 Years. After this time period lapses, the backup is deleted.The Retention Time setting applies to all future backups for a bucket. Previous backups are unaffected by changes to this setting.
-
-
Once you’re satisfied with the configuration, click Update.
If no backup schedule currently exists for the bucket, then the first automatic backup will occur at the next increment of the Incremental Every value, calculated backward from the configured Start at time.
Once the backup has successfully completed, it will display under the Backups tab.
Create an On-Demand Backup
In addition to scheduled backups, you can also create an on-demand backup of a bucket. An on-demand backup is always a Full backup and is always scheduled immediately, irrespective of the bucket’s Backup Schedule.
-
Go to the cluster’s Buckets tab.
-
Go to the Clusters tab in the main navigation.
-
Find and click on the cluster on which you want to create an on-demand backup.
This action opens the cluster with its Metrics tab selected.
-
Click the Buckets tab.
-
-
On the far right side of the bucket you are working with, click More options () > Settings:
There can be a slight delay while the backup is scheduled and when the backup is run. After a few moments, the jobs panel near the top of the cluster screen will show that a backup is running and its progress. On-demand backup events are also shown in the Activity Explorer, which includes events for when an on-demand backup was triggered, when it started, and when it was completed.
Once the backup has successfully completed, it will display under the Backups tab.
| On-demand backups are retained for 30 days. |
View Backup Details
You can view more detailed information about a cluster backup by inspecting it in the Capella UI.
-
Go to the cluster’s Backups tab.
-
Go to the Clusters tab in the main navigation.
-
Find and click on the cluster with the backup details you want to see.
This action opens the cluster with its Metrics tab selected.
-
Click the Backups tab.
The Latest Backups Per Bucket list shows the details of the most recent backup for each bucket in the cluster where a backup exists.
-
-
Click the name of the bucket whose backups you want to inspect.
This action opens the All Backups screen with the current bucket selected and its recent backups shown.
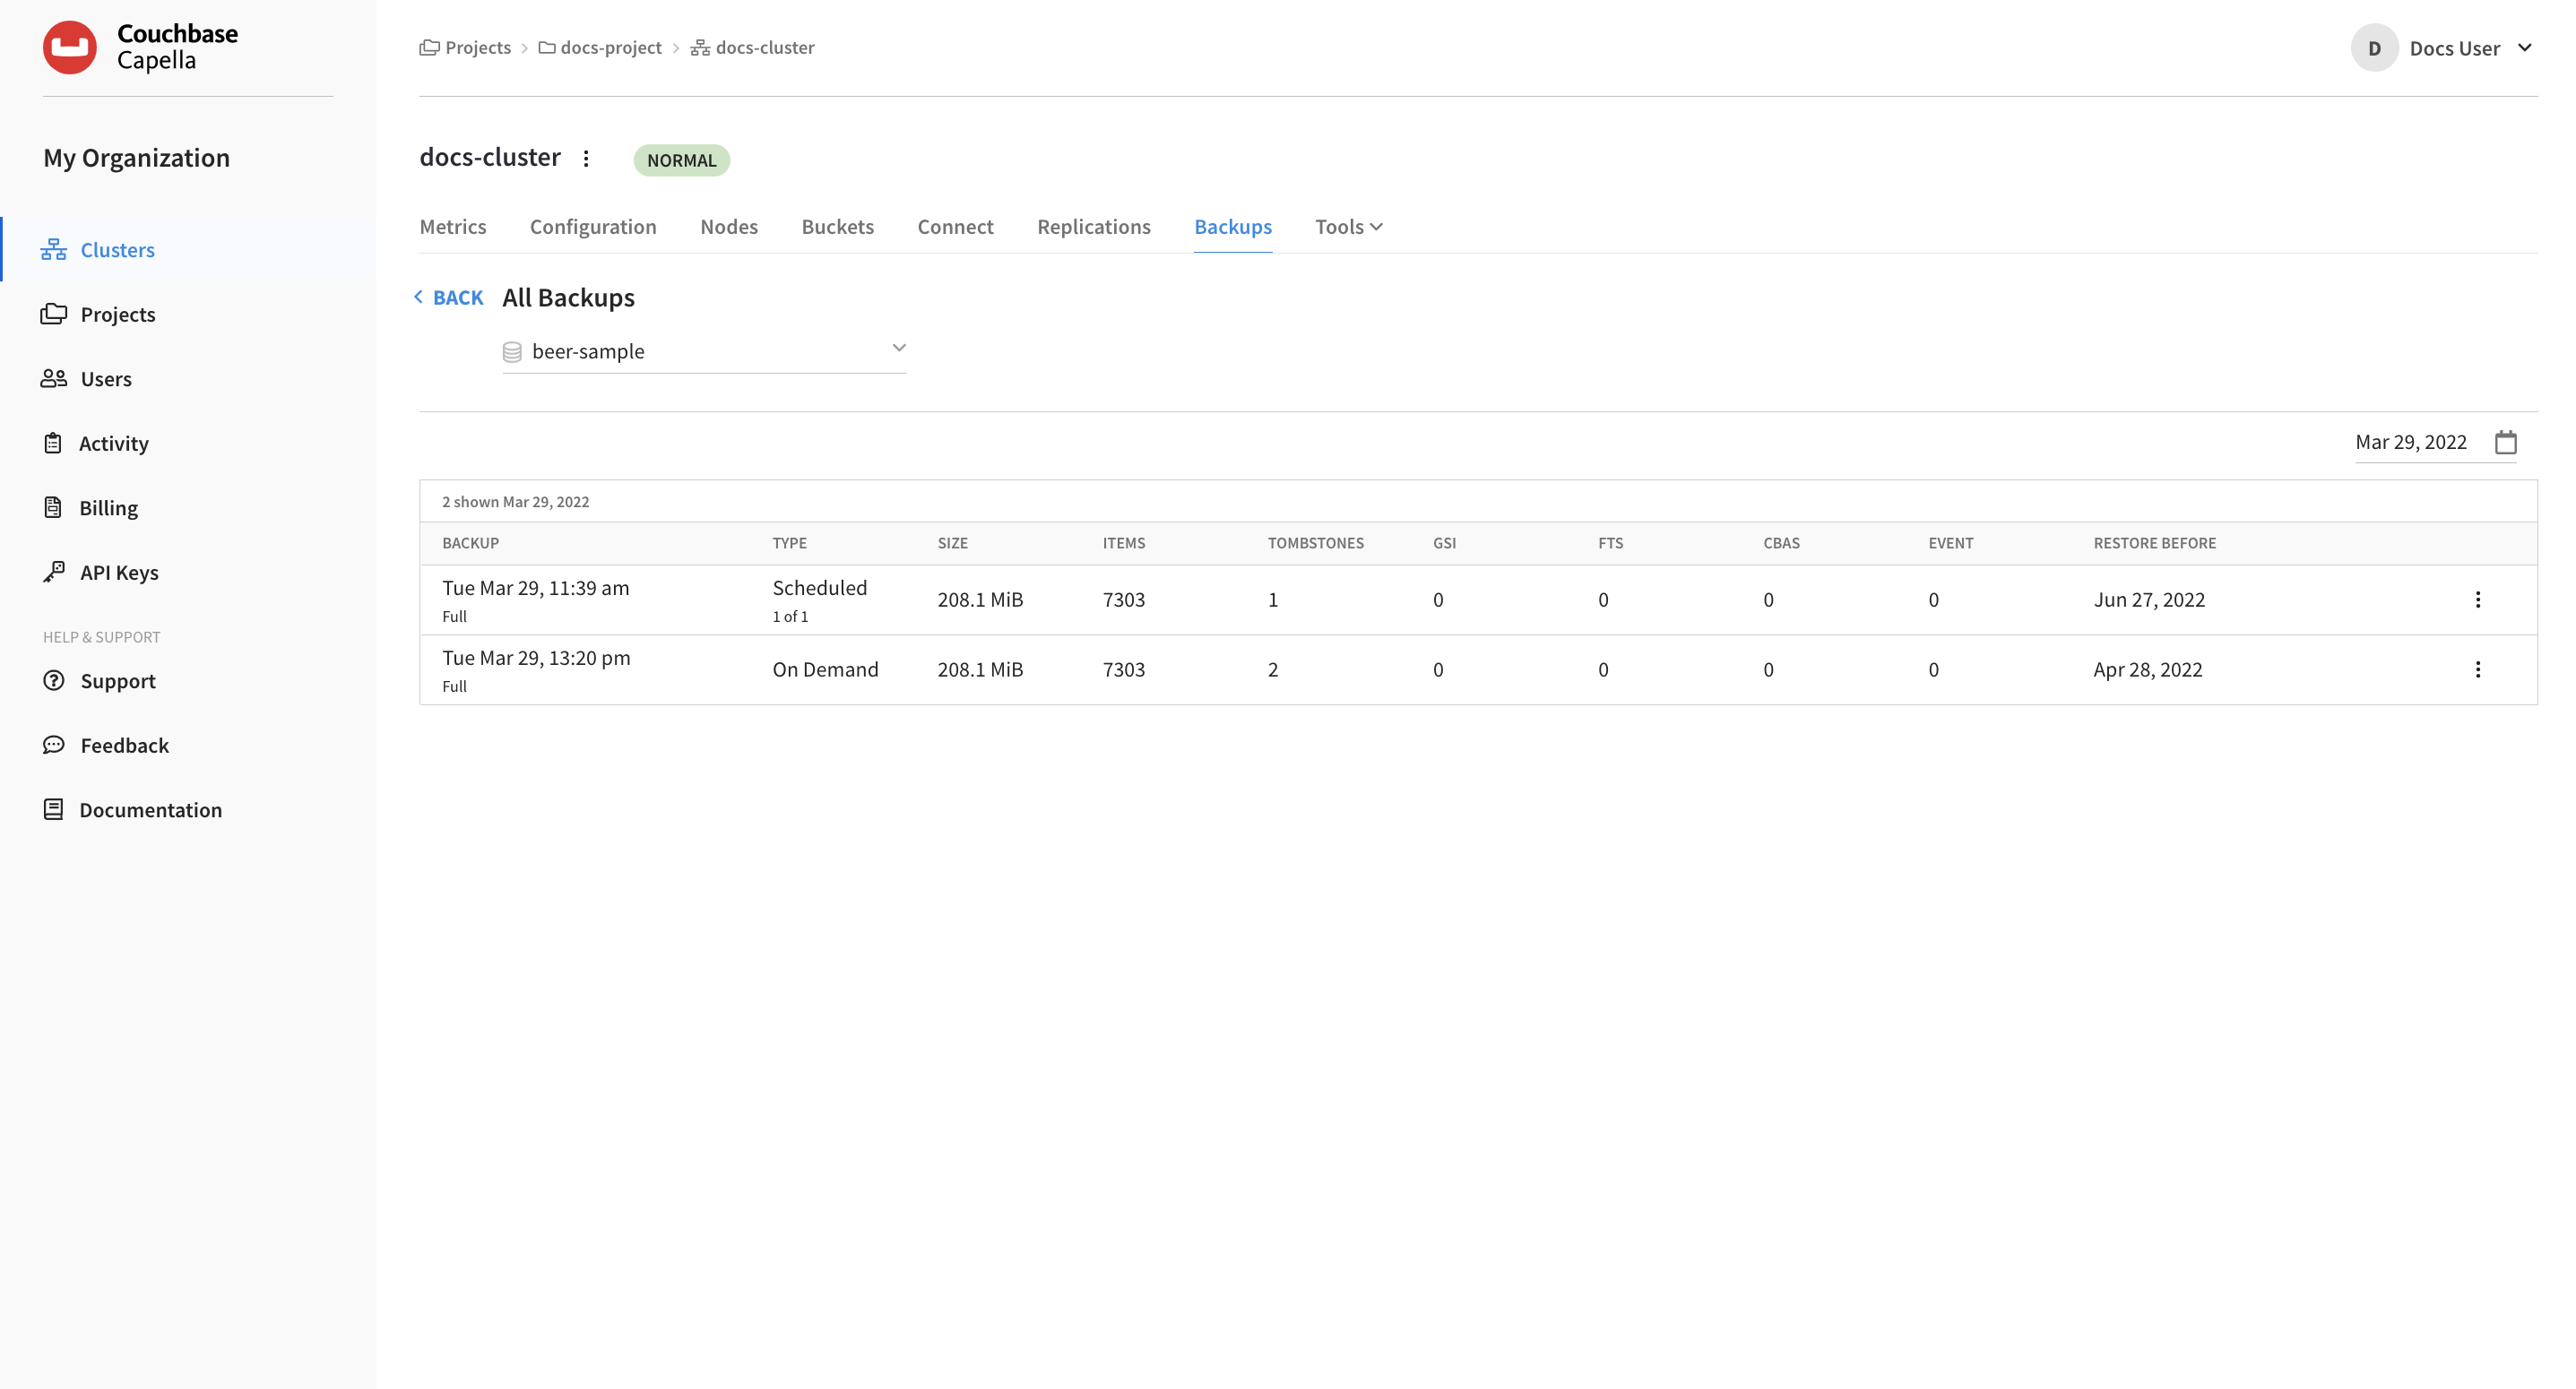
Each backup is listed with the date and time that it finished, the backup type, and if it was a Scheduled or On Demand backup, depending on whether the backup was created automatically according to the cluster’s automatic backup schedule or if it was created on-demand. If the backup method is Scheduled, the number each backup falls in the series is shown.
View Backups by Date
The All Backups page shows only those backups for the current backup cycle. To view backups that belong to previous cycles:
-
On the right side of the All Backups page, click the calendar icon.
-
Use this date picker to select the date when the backup cycle that you want to view took place.
This action will automatically refresh the page to show older scheduled and on-demand backups.
Delete a Backup
| Deleting a backup is a permanent action. |
When you delete a cluster, you are also deleting any bucket backups it may contain. When deleting a bucket, the bucket backups are maintained until their preconfigured Backup Time.
In Couchbase Capella, backups are deleted in the following ways:
- Manual deletion
-
You have the option to manually delete a set of scheduled backups or individual manual backups.
-
Go to the cluster’s Backups tab.
-
Go to the Clusters tab in the main navigation.
-
Find and click on the cluster on which you want to delete a backup.
This action opens the cluster with its Metrics tab selected.
-
Click the Backups tab.
-
-
Click the name of the bucket with the backups that you are deleting.
This action opens the All Backups page.
-
Click the More options icon that corresponds with the backup you want to delete.
If you are deleting a scheduled series of backups, find the most recent backup. If you are deleting an on-demand backup, find that backup.
-
In the More options menu, click Delete Backup
This action opens the Delete Backup fly-out menu.
-
Confirm the delete request.
-
Type
deleteinto the provided field. -
Click Delete
-
-
The specified backup is deleted. This action cannot be undone.
- Exceeding the Backup Time
-
Once a backup’s age exceeds the value set for Backup Time in the Backup Schedule, it will automatically be deleted.
- The cluster is deleted
-
If the cluster in which the backup resides is deleted, then all of the backups that were stored in the cluster are also deleted.
View and Manage Backups for Couchbase Capella in Own VPC
|
This information is for anyone still using Couchbase Server 6.6, hosted in their own cloud provider’s VPC. It does not apply to Couchbase 7.0, hosted in Couchbase’s VPC and fully managed for you. For further information contact Couchbase. The easiest way to get started with Capella, our fully managed DBaaS, is hosting in Couchbase’s Cloud. |
Accessing Cluster Backups in the Capella UI
Backups can be accessed under the cluster’s Backup & Restore tab.
|
Permissions Required
In order to access backups in the Capella UI, the following permissions are required:
|
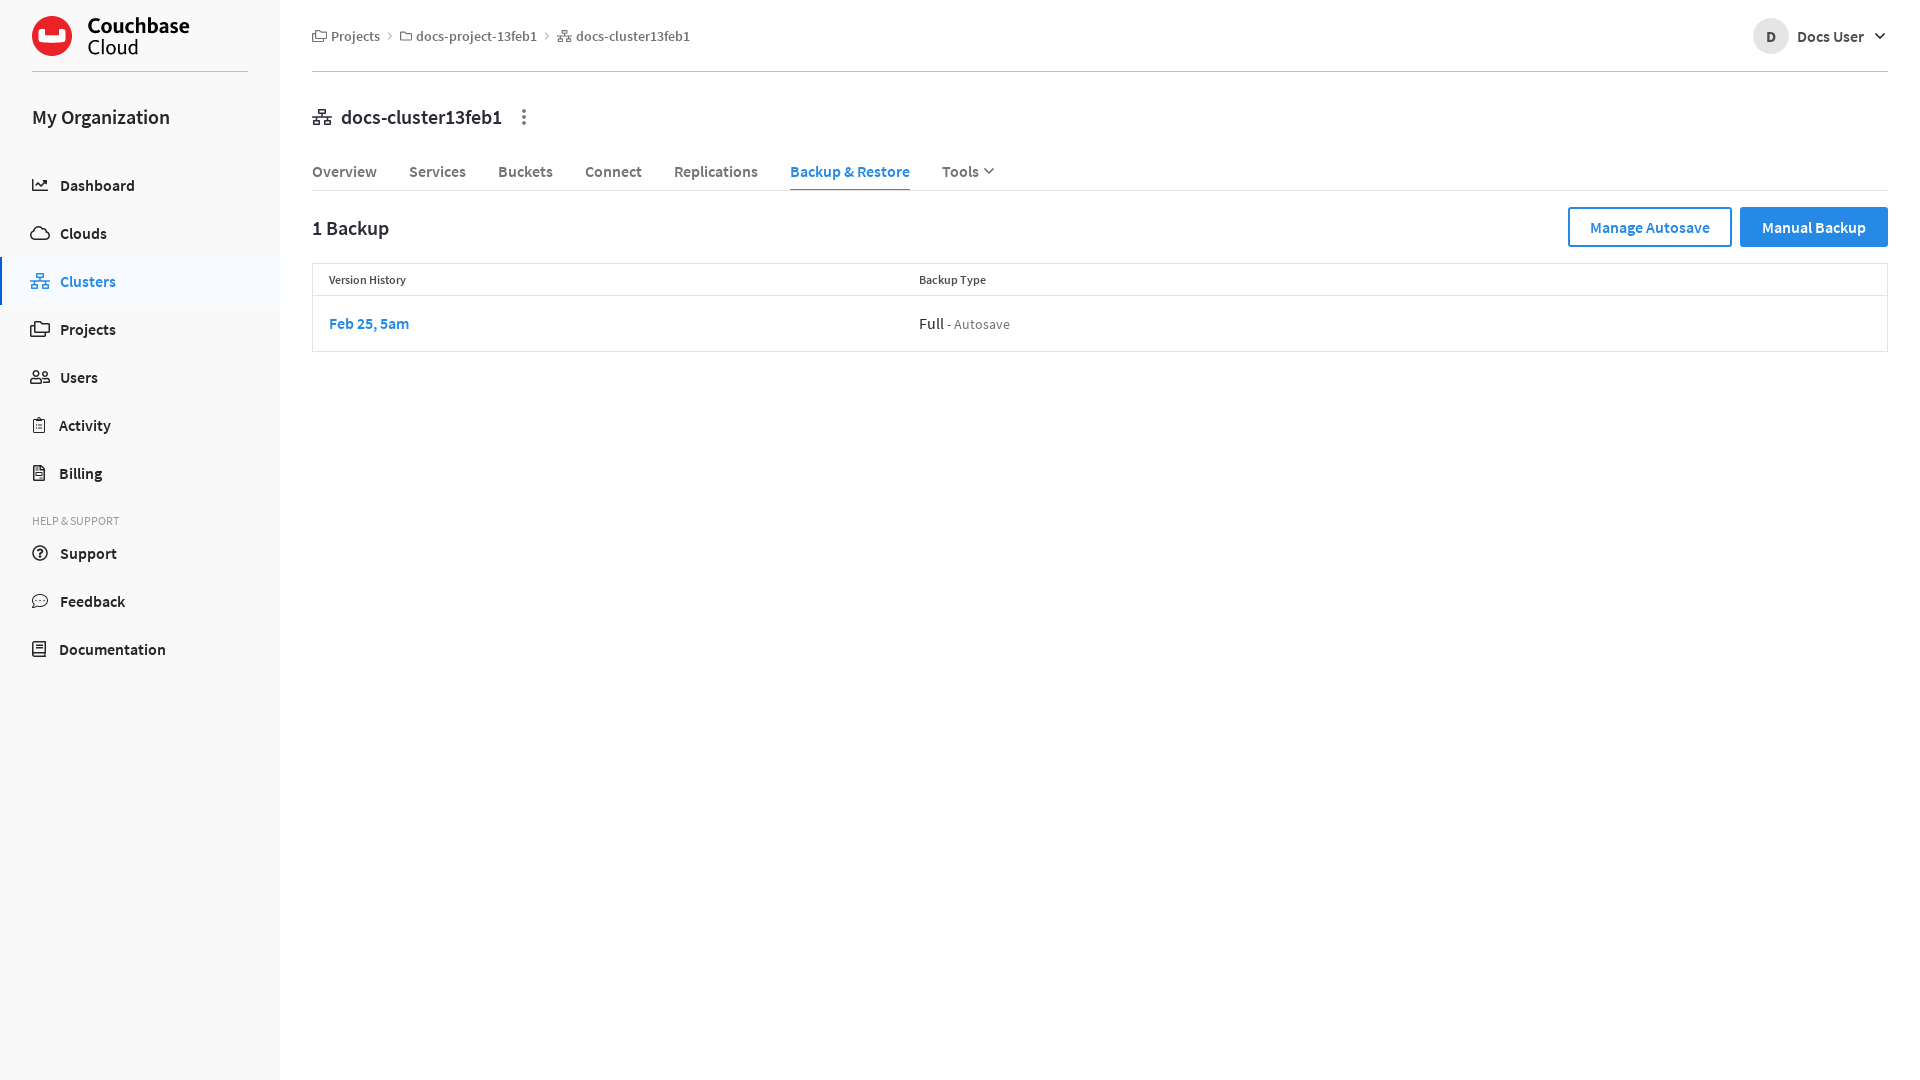
Backup Summary
A cluster’s Backup & Restore tab shows a summary of all the backups that exist for that cluster. The summary is displayed in table format, with sortable columns and a row for each backup.
The Backups list displays the following information about each backup:
- Version History
-
The time and date range for the backup set. If the Backup Type is Full, the time and date when the backup completed is displayed. If the Backup Type is Series, the date range between the first and last backup in the series is displayed.
- Backup Type
-
The backup’s type, as well as the backup method that was used to create the backup. The backup type can be Full or Series. Refer to Backup Types for more information.
The backup method that was used to create the backup is also listed in the same field alongside the backup type. The backup method can be either Autosave or Manual, depending on whether the backup was created automatically according to the cluster’s automatic backup schedule or if it was created manually.
A Series backup is listed as Full until it includes at least one Incremental backup, after which the backup type changes to Series.
Configure Automatic Backups
Automatic backups are mandatory for all clusters in Capella. A cluster will begin to take automatic backups upon successful deployment. The frequency and retention of automatic backups are determined by each cluster’s individual Autosave Schedule.
All clusters are deployed with a default Autosave Schedule. It is recommended that you change each cluster’s Autosave Schedule according your Recovery Time Objective (RTO) and Recovery Point Objective (RPO). For example, production clusters may require a much smaller backup window and a much longer backup retention period than development clusters.
|
Permissions Required
To change a cluster’s Autosave Schedule, the following permissions are required:
|
-
Go to the cluster’s Backup & Restore tab.
-
Go to the Clusters tab in the main navigation.
-
Find and click on the cluster that you wish to configure automatic backups for.
This opens the cluster with its Overview tab selected.
-
Click the Backup & Restore tab.
-
-
Click Manage Autosave.
This opens the Autosave Schedule fly-out menu.
-
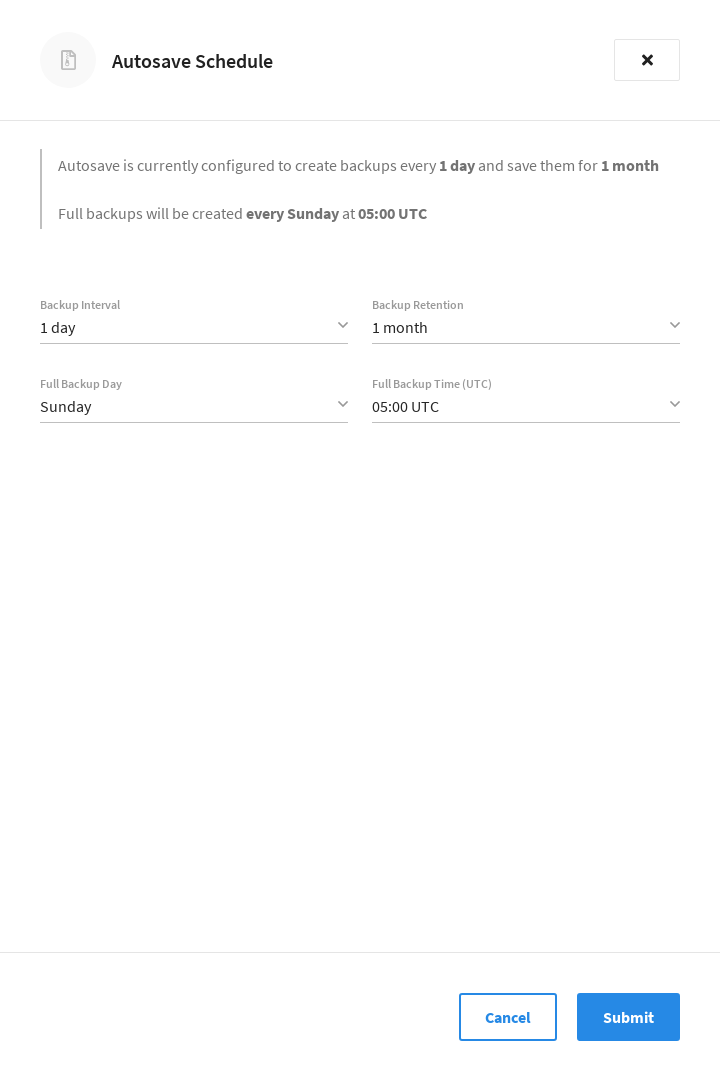
Configure the cluster’s Autosave Schedule.
The interactive fields are:
- Backup Interval
-
The frequency with which backups are taken. This can be
4 hours,8 hours,1 day,1 week,1 month, or1 year; and can be selected from the field’s dropdown menu. The default value is1 day.When set to
4 hours,8 hours, or1 day, a weekly Series backup will be created (except when Full Backup Day is set toEvery Day). After the first Full backup, each subsequent automatic backup that occurs over the course of the week will be an Incremental backup. Once the next Full backup occurs, a new weekly Series backup will be created and new Incremental backups will be a part of the new series. Full backups always occur on the day and time determined by the Full Backup Day and Full Backup Time (UTC) fields.When set to
1 week,1 month, or1 year, every backup will be a Full backup.The backup interval is calculated in increments of 4/8/24 hours from the Full Backup Time (UTC). Changing Backup Interval to 4 hoursor8 hourswill result in the next backup occuring at a time that is calculated back from Full Backup Time (UTC). For example, if it’s currently 20:00 UTC and Full Backup Time (UTC) is05:00 UTC, then if you change the backup interval to8 hours, the next Incremental backup will occur at 21:00 UTC (eight hours prior to 05:00 UTC). - Backup Retention
-
The amount of time each backup will be preserved, after which the backup will be deleted. This can be
1 day,1 week,1 month…11 months, or1 year…10 years. The default value is1 month.Backups are not deleted when the cluster is deleted, and will continue to be stored in the connected cloud according to the retention period that was configured at the time the cluster was deleted. Refer to the Delete a Backup section below for more information.
The Backup Retention setting applies to all existing and future backups, including manual backups. If you shorten the retention period, any existing backups that fall outside of the new retention period will be deleted. Backups can be lost within minutes of submitting a new Autosave Schedule that has a shorter Backup Retention setting. Deleted backups cannot be recovered.
- Full Backup Day
-
The day of the week on which the next Full backup is taken. This can be
Monday,Tuesday,Wednesday,Thursday,Friday,Saturday,Sunday, orEvery Day. The default value isSunday.The value for Full Backup Day does not apply to the first automatic backup of the cluster. The first automatic backup will occur at the next increment of the Backup Interval, no matter what day it is. If the interval is
1 day, then the first backup will simply occur the next time the Full Backup Time (UTC) occurs. If the interval is4 hoursor8 hours, then the first backup will occur at the first increment calculated back from Full Backup Time (UTC).After the first backup is taken, all subsequent Full backups will occur on the day set in Full Backup Day.
If Full Backup Day is set to Every Day, then Backup Interval must be set to1 day. - Full Backup Time (UTC)
-
The time of day when a Full backup is taken (only occurs on the day set in Full Backup Day). This can be any half-hour increment between
00:00 UTCand23:30 UTC. The default value is05:00 UTC.If you change the value of Full Backup Time (UTC), the next Incremental backup may occur at a different time than you might expect. This is because the value for Backup Interval is calculated in increments of 4/8/24 hours from the Full Backup Time (UTC).
For example, let’s say Backup Interval is currently set to
8 hoursand Full Backup Time (UTC) is set to04:00 UTC. If the current time is 21:00 UTC, you would see that an Incremental backup was taken at 20:00 UTC (eight hour interval). If you were to then set Full Backup Time (UTC) to06:00 UTC, then you would eventually see that another Incremental backup was taken at 22:00 UTC, just two hours later. This is because the eight hour backup interval was recalculated back from the new06:00 UTCvalue.
-
Once you’re satisfied with the configuration, click Submit.
Note that there can be a slight delay while the schedule is saved, after which the fly-out menu will close.
If no Full Autosave backup currently exists for the cluster (such as when a cluster is first deployed), then the first automatic backup will occur at the next increment of the Backup Interval, calculated back from Full Backup Time (UTC). (Refer to the description of Full Backup Day above.)
Once the backup has successfully completed, it will display in the Backups list.
Create a Manual Backup
In addition to automatic backups, you can also create on-demand manual backups of clusters. A manual backup is always a Full backup, and is always scheduled immediately, irrespective of the cluster’s Autosave Schedule.
|
Permissions Required
To create a manual backup of a cluster, the following permissions are required:
|
-
Go to the cluster’s Backup & Restore tab.
-
Go to the Clusters tab in the main navigation.
-
Find and click on the cluster that you wish to create a manual backup of.
This opens the cluster with its Overview tab selected.
-
Click the Backup & Restore tab.
-
-
Click Manual Backup.
This opens the New Manual Backup fly-out menu.

-
To create a new manual backup, click Create Backup.
Note that there can be a slight delay while the backup is scheduled, after which the fly-out menu will close.
Once the backup has successfully completed, it will display in the Backups list.
| Manual backups are not retained indefinitely. They are retained according to the retention period set in the Autosave Schedule. |
View Backup Details
You can view more detailed information about a cluster backup by inspecting it in the Capella UI.
|
Permissions Required
To view details about a backup, the following permissions are required:
|
-
Go to the cluster’s Backup & Restore tab.
-
Go to the Clusters tab in the main navigation.
-
Find and click on the cluster that contains the backup that you wish to inspect.
This opens the cluster with its Overview tab selected.
-
Click the Backup & Restore tab.
-
-
In the Backups list, find and click on the backup that you wish to inspect.
This opens the backup’s fly-out menu. The details available in the fly-out menu will be different depending on whether the backup is strictly a Full backup, or whether it is a Series backup.
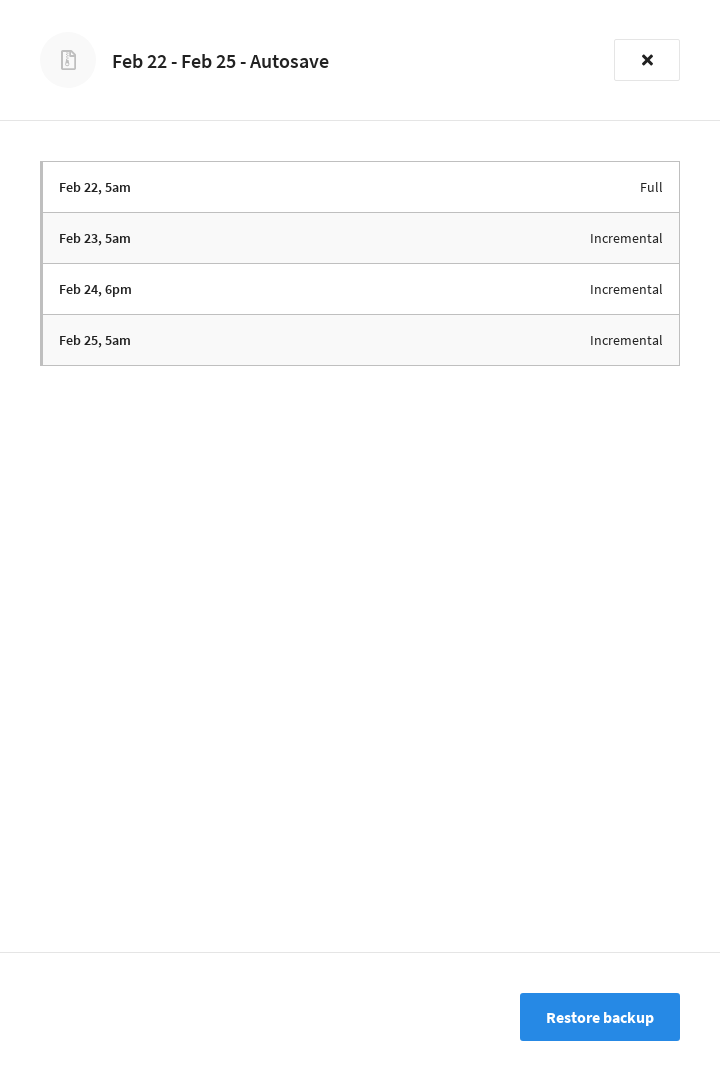
The backup’s fly-out menu principally contains details about the backup type. For Manual backups, and any Autosave backups that don’t include Incremental backups, only the Full backup is listed. For Series backups, the Full backup is listed, along with all associated Incremental backups that are currently in the series.
Each backup is listed with the date and time that it finished, along with the backup type (Full or Incremental).
Delete a Backup
Backups are not deleted when the bucket is deleted, and will continue to be stored in the cluster up until the retention period that was configured at the time the bucket was deleted.
| This information on retention applies only to Couchbase Server 6.6, hosted in your own cloud provider’s VPC. It does not apply to to the majority of Capella Clusters — running Couchbase 7.0, hosted in Couchbase’s VPC, and fully managed for you. For deletion details for these, see above |
Backups can be deleted in the following ways:
-
Manual deletion
The Capella UI does not currently support the manual deletion of cluster backups. However, you can delete them directly from the connected cloud using your cloud provider’s console. Refer to the View Backup Files section for more information.
-
Exceeding the backup retention period
Once a backup’s age exceeds the value set for Backup Retention in the Autosave Schedule, it will automatically be deleted.
-
The connected cloud is deleted
If the connected cloud in which the backup resides is deleted, then all of the backups that were stored in the connected cloud are deleted.
View Backup Files
For Capella clusters hosted by Couchbase, backups can be seen in the Backups tab for the cluster. If you are hosting Capella in your own cloud provider’s VPC, then details of the Backup files are given below.
For customers hosting Capella in their own cloud provider’s VPC, cluster backups are stored in the connected cloud in which the cluster resides.
For AWS, the backups for all clusters in a given connected cloud are located in an S3 bucket at the following location:
Amazon S3 > couchbase-cloud-name-ID > backups
Within backups there is a separate directory for each cluster, each named with the cluster’s ID.
Each cluster directory contains all of the backups for an individual cluster.
|
At this time, the easiest way to find the cluster’s ID is to navigate to to the cluster’s Overview tab, and inspect the URL in your browser: https://cloud.couchbase.com/projects/efba5ea1-a3f8-448c-b02d-14d69170c992/clusters/c4827955-d6fd-4108-b43a-ce195efccb9b?tenantId=58df477a-2342-4f63-8248-752f333f93c0 The cluster ID directly follows |
So, as an example, if the name of the connected cloud is My-Cloud (with Cloud ID ending in 037df), and the cluster’s ID is 0dd4cf22-0008-43a7-a382-5cf762ea9d7a, then the cluster’s backup directory could be found at the following location in S3:
/couchbase-my-cloud-037df/backups/0dd4cf22-0008-43a7-a382-5cf762ea9d7a/
Backup File Layout
Each sub-directory within a cluster’s backup directory is known as a backup repository. A backup repository contains all of the bucket data, logs, and metadata associated with a backup (Full or Series). When looking at the cluster’s Backup & Restore tab in the Capella UI, one row in the [backup-vpc-summary-vpc] represents one backup repository in the cluster’s backup directory.
Each backup repository contains one Full backup. If it is a Series backup, the repository contains one Full backup plus all the Incremental backups from the rest of the series. The entire contents of a backup repository are required to perform a successful restore operation.
| To preserve an emergency copy of a backup, you can use your cloud provider’s console to download a single backup repository (one cluster backup) or the cluster’s entire backup directory (all of the cluster’s backups). |
Each backup repository is named with a backup ID. The backup ID starts with the date of the Full backup, and is appended with a set of alphanumeric characters.
2020-09-25-25e1476f
A backup repository that contains a manual backup also has -manual appended to its ID.
2020-09-24-e7463699-manual
The following is an example layout of a backup repository containing a Series backup:
S3/couchbase-my-cloud-037df/backups/0dd4cf22-0008-43a7-a382-5cf762ea9d7a/   # Cluster backup directory
|-- 2020-09-25-25e1476f     # Backup repository
|   |-- 2020-09-25-25e1476f
|   |   |-- {year}-{month}-{day}T{hr}_{min}_{sec}.{nanos}  # First backup in series (Full)
|   |   |   |-- {bucket name}-{bucket uuid}  # Bucket backup
|   |   |   |-- travel-sample-4dfa8b44dce990c5580bd13716c30885  # Bucket backup
|   |   |   |   |-- data
|   |   |   |   |   |-- .storage_meta
|   |   |   |   |   |-- failoverlog_0.fol
|   |   |   |   |   |-- failoverlog_1.fol
|   |   |   |   |   |-- .shard_0.sqlite.0   # Cluster data
|   |   |   |   |   |-- .shard_1.sqlite.0   # Cluster data
|   |   |   |   |   |-- snapshot_0.snp
|   |   |   |   |   |-- snapshot_1.snp
|   |   |   |   |   |-- stats_0.json
|   |   |   |   |   |-- stats_1.json
|   |   |   |   |-- .restrictions.json
|   |   |   |   |-- analytics.json
|   |   |   |   |-- bucket-config.json
|   |   |   |   |-- full-text.json  # Full Text Indexes
|   |   |   |   |-- gsi.json    # Global Secondary Indexes
|   |   |   |   |-- range.json
|   |   |   |   |-- views.json
|   |   |   |-- .info
|   |   |   |-- .version
|   |   |   |-- events.json
|   |   |   |-- fts-aliases.json
|   |   |   |-- plan.json
|   |   |-- 2020-09-25T04_32_19.934323735Z  # Second backup in series (Incremental)
|   |   |-- 2020-09-25T08_32_29.707502389Z  # Third backup in series (Incremental)
|   |   |-- backup-meta.json    # Backup configuration
|   |-- logs
|   |-- .backup
File Descriptions
- backup-meta.json
-
This file is used to store the backup configuration for the backup repository. Each time a backup is run it will read these options, connect to the cluster, and backup data from the point where it last left off. All parameters in this file are configured automatically by Couchbase Capella.
- gsi.json
-
This file contains a backup of all global secondary indexes in a particular bucket.
- full-text.json
-
This file contains a backup of all Full Text Indexes in a particular bucket.
- .shard_*.sqlite.0
-
These are sqlite files that contain the cluster data.