How-to Guide: Couchbase User RBAC
A how-to guide on configuring Couchbase user authentication and authorization using the Autonomous Operator.
Overview
This guide will describe how to create authenticated users and bind them to specific roles to provide multiple levels of authorization using the Autonomous Operator. Users can be authenticated either by Couchbase’s built-in authentication system or by an external authentication system such as OpenLDAP.
The Autonomous Operator refers to Couchbase Authentication as the local domain, and LDAP Authentication as the external domain.
This guide will focus on using the local domain for authentication.
Prerequisites
-
If you are new to role-based access control in Couchbase, refer to the Roles Page
-
If you are new to Couchbase Autonomous Operator (CAO), refer to the Autonomous Operator Introduction
-
Couchbase Scopes and Collections was added in Version 7.0. Refer to the Couchbase Scopes and Collections page to learn more about these.
-
Some of the examples in this guide use the
cbcCLI tool, see the installation page here for more details.
Setup a bucket called Travel, a scope called Inventory, and two collections called Transport and Hotel.
See Manage Scopes and Collections for more information on how to do this.
We’ll create two users named Alice and Bob in the next steps, but we won’t assign any roles to them just yet. As we progress through this guide, we’ll assign roles based on scenarios.
Create Users
In order to create a user, we need to create a password first, in the form of a Kubernetes secret.
The local Couchbase domain performs internal password management and requires a password to be provided during user creation.
|
The below command creates the password for users "Alice" and "Bob":
cat << EOF | kubectl create -f -
apiVersion: v1
kind: Secret
metadata:
  name: alice-password
type: Opaque
data:
  password: cGFzc3dvcmQ=   # password
---
apiVersion: v1
kind: Secret
metadata:
  name: bob-password
type: Opaque
data:
  password: cGFzc3dvcmQ=   # password
EOF
Using the above secrets, we are going to create the users.
cat << EOF | kubectl apply -f -
apiVersion: couchbase.com/v2
kind: CouchbaseUser
metadata:
  name: alice
spec:
  fullName: "Alice"
  authDomain: local
  authSecret: alice-password (1)
---
apiVersion: couchbase.com/v2
kind: CouchbaseUser
metadata:
  name: bob
spec:
  fullName: "Bob"
  authDomain: local
  authSecret: bob-password (2)
EOF| 1 | Password for Alice |
| 2 | Password for Bob |
Create Groups and RoleBindings
Now that we’ve created the users, we can bind them with groups. In order to do that, we are going to create groups and bind them with the users using role bindings.
Copy the below command to create a group and role binding for user "Alice":
cat << EOF | kubectl apply -f -
apiVersion: couchbase.com/v2
kind: CouchbaseGroup
metadata:
  name: group-for-alice
spec:
  roles: []
---
apiVersion: couchbase.com/v2
kind: CouchbaseRoleBinding
metadata:
  name: role-binding-for-alice (1)
spec:
  subjects:
  - kind: CouchbaseUser
    name: alice
  roleRef:
    kind: CouchbaseGroup
    name: group-for-alice
EOF| 1 | The new role binding, with name role-binding-for-alice, binds the new user (alice) with the new group (group-for-alice). |
In the above groups we have not assigned any roles to them. We’ll do it in the next section.
Scenarios
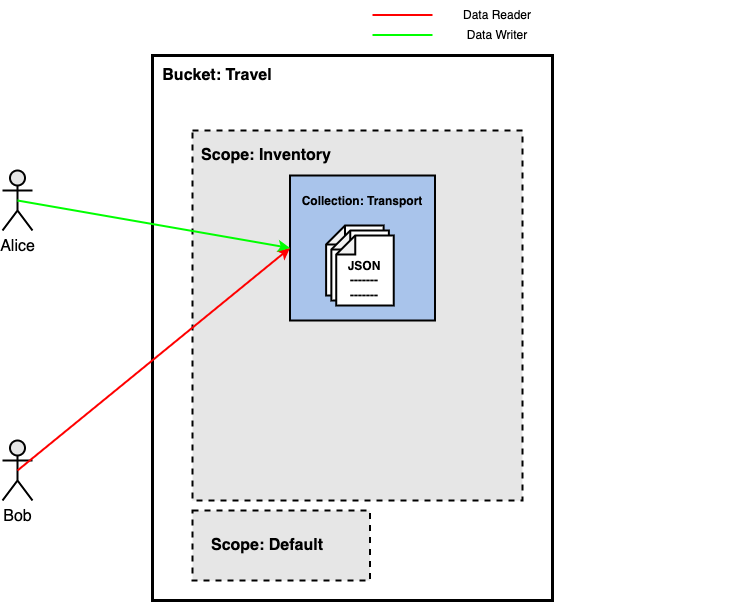
Single Scope and Collection
As you may know, buckets contain scopes, and scopes have collections.
We’ll use one scope and one collection for this scenario — named Inventory and Transport, respectively.
Alice is the Transport collection’s Data Writer, and Bob is the Transport collection’s Data Reader.
This means that Alice can write but not read data in the Transport collection, and Bob can read but not write data in the same.
Updating Roles
In order to give access to Alice and Bob, we need to update the groups created for them in the previous section.
Copy the below command to update the groups with appropriate roles.
cat << EOF | kubectl apply -f -
apiVersion: couchbase.com/v2
kind: CouchbaseGroup
metadata:
  name: group-for-alice
spec:
  roles: (1)
  - name: data_writer
    bucket: travel
    scopes:
      resources:
      - name: inventory
    collections:
      resources:
      - name: transport
---
apiVersion: couchbase.com/v2
kind: CouchbaseGroup
metadata:
  name: group-for-bob
spec:
  roles: (2)
  - name: data_reader
    bucket: travel
    scopes:
      resources:
      - name: inventory
    collections:
      resources:
      - name: transport
EOF| 1 | The couchbase roles that we want to assign to Alice. |
| 2 | The couchbase roles that we want to assign to Bob. |
Once the roles are configured, users will have the appropriate permissions, which can be verified in the Couchbase UI.
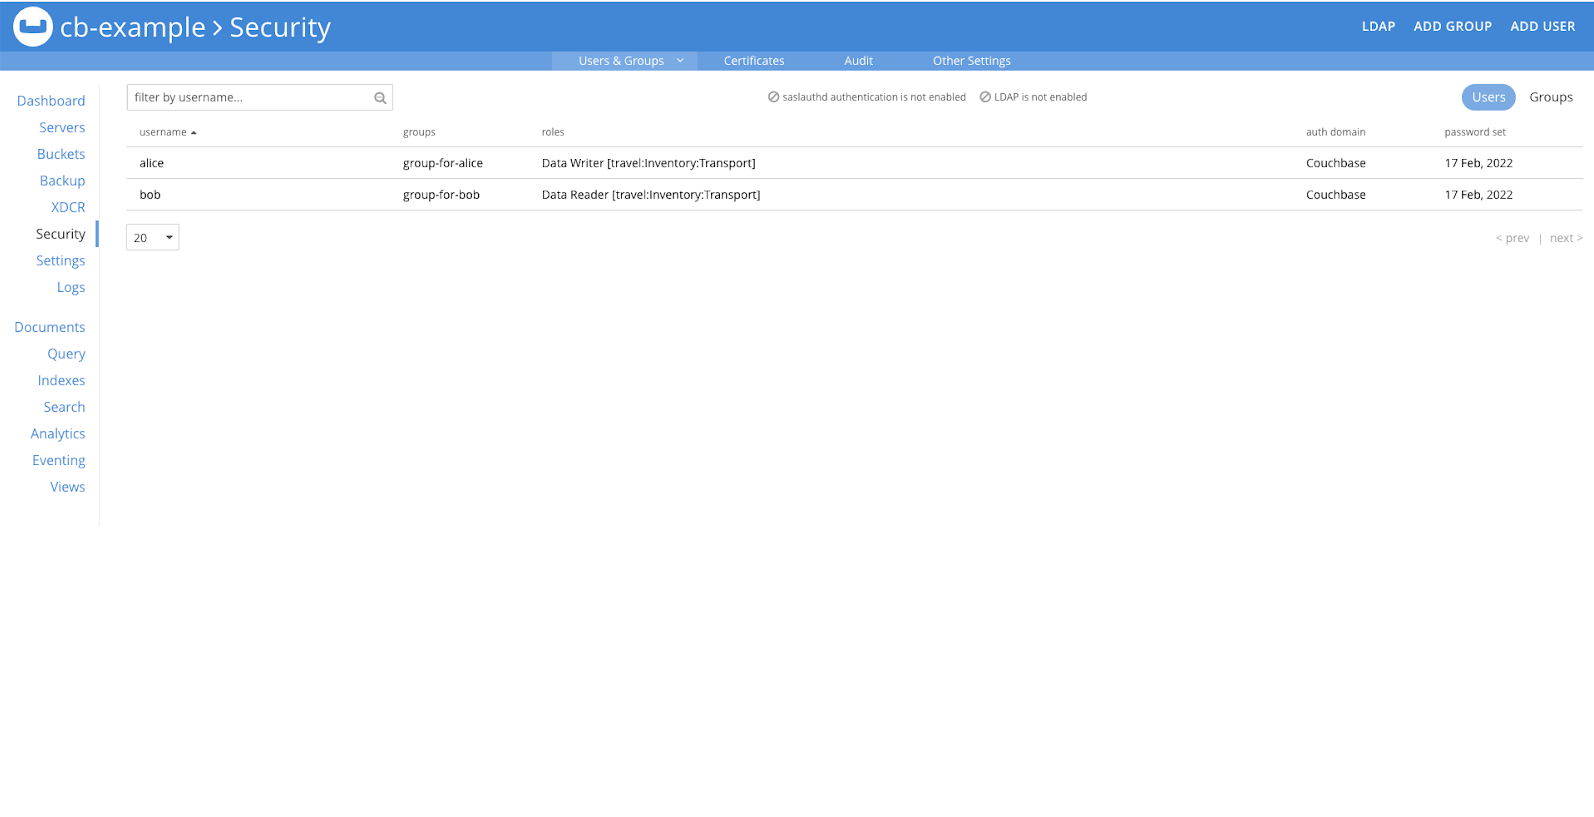
Verification
Using the data_writer and data_reader roles, we cannot use the UI to login.
To verify that the users are assigned the desired roles, use the cbc CLI or one of the SDK Clients.
Let’s try with user Alice first, and use the cbc CLI tool to create a document in Couchbase.
cbc create -u alice -P password mydoc -V '{"key":"value"}' -M upsert -U couchbase://cb-example/travel \
--scope Inventory \
--collection Transportmydoc Stored. CAS=0x16d48f429afe0000
SYNCTOKEN=948,114825287260906,3We can see from the above example that Alice was able to write the data. Let’s see whether Alice can read the data or not.
cbc get mydoc -u alice -P password -U couchbase://cb-example/travel \
--scope Inventory \
--collection Transportmydoc LCB_ERR_AUTHENTICATION_FAILURE (206)
Ref: Context:We can observe that Alice was unable to read data, and an authentication failure error was returned.
Now, let’s try the same thing with Bob.
cbc create -u bob -P password mydoc -V '{"key":"value"}' -M upsert -U couchbase://cb-example/travel \
--scope Inventory \
--collection Transportmydoc LCB_ERR_AUTHENTICATION_FAILURE (206)
Ref:We can see that Bob was unable to write the data and received an authentication failure error in this example. Let’s see whether Bob can read the data or not.
cbc get mydoc -u bob -P password -U couchbase://cb-example/travel \
--scope Inventory \
--collection Transportmydoc CAS=0x16d48f429afe0000, Flags=0x0, Size=15, Datatype=0x01(JSON)
{"key":"value"}Bob was able to read the data, as can be seen from the above example.
This confirms that Alice can only write data to the Transport collection and Bob can only read data from it.
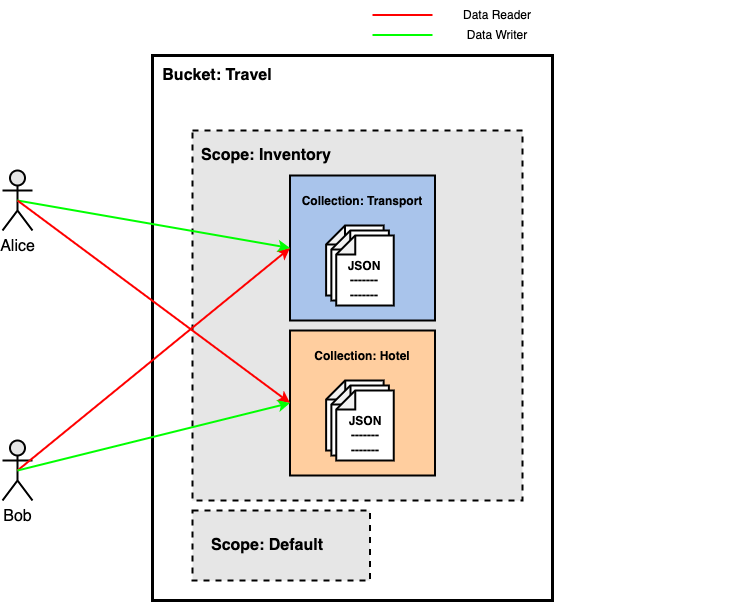
Single Scope and Multiple Collections
In this scenario, we’ll use one scope named Inventory and two collections named Transport and Hotel.
Alice is the Transport collection’s Data Writer and Hotel collection’s Data Reader.
Bob is the Transport collection’s Data Reader and Hotel collection’s Data Writer.
This means that Alice can write in the Transport collection and read data from the Hotel collection, and Bob can read data from the Transport collection and write data in the Hotel collection.
Updating Roles
In order to give access to Alice and Bob, we need to update the groups created for them in the previous section.
Copy the below command to update the groups with appropriate roles.
cat << EOF | kubectl apply -f -
apiVersion: couchbase.com/v2
kind: CouchbaseGroup
metadata:
  name: group-for-alice
spec:
  roles: (1)
  - name: data_writer
    bucket: travel
    scopes:
      resources:
      - name: inventory
    collections:
      resources:
      - name: transport
  - name: data_reader
    bucket: travel
    scopes:
      resources:
      - name: inventory
    collections:
      resources:
      - name: hotel
---
apiVersion: couchbase.com/v2
kind: CouchbaseGroup
metadata:
  name: group-for-bob
spec:
  roles: (2)
  - name: data_reader
    bucket: travel
    scopes:
      resources:
      - name: inventory
    collections:
      resources:
      - name: transport
  - name: data_writer
    bucket: travel
    scopes:
      resources:
      - name: inventory
    collections:
      resources:
      - name: hotel
EOF| 1 | The couchbase roles that we want to assign to Alice. |
| 2 | The couchbase roles that we want to assign to Bob. |
Once the roles are configured, users will have the appropriate permissions and it can be verified in Couchbase UI, as demonstrated in the image below.
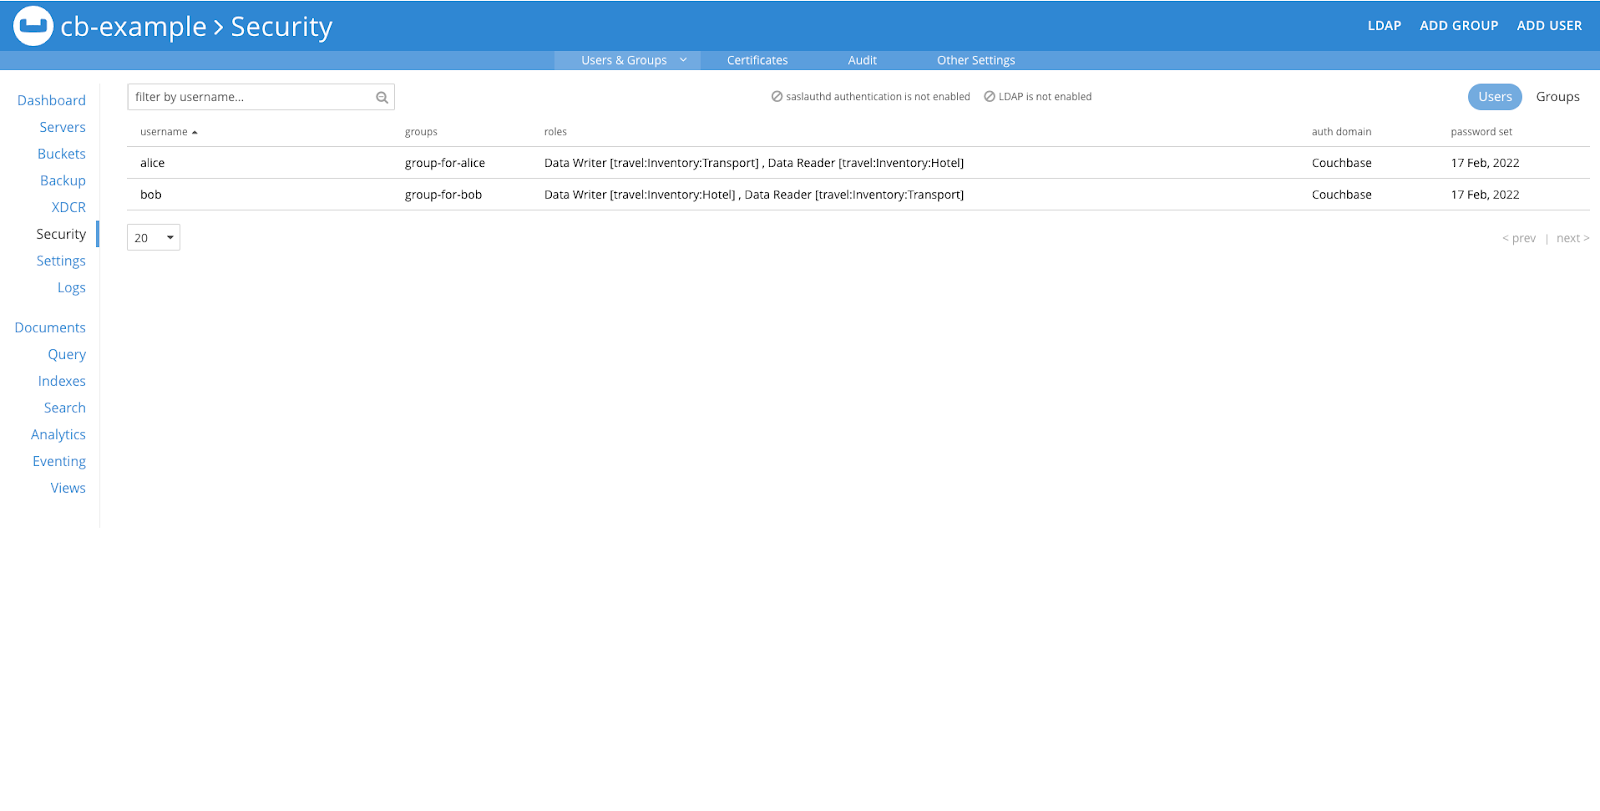
Verification
Now, we can verify that the users are assigned the desired roles for both collections.
Let’s try with user Alice first, and use the cbc CLI tool to create a document in Couchbase.
cbc create -u alice -P password mydoc -V '{"key":"value"}' -M upsert -U couchbase://cb-example/travel \
--scope Inventory \
--collection Transportmydoc Stored. CAS=0x16d48f429afe0000
SYNCTOKEN=948,114825287260906,3We can see from the above example that Alice was able to write the data. Let’s see whether Alice can read the data or not.
cbc get mydoc -u alice -P password -U couchbase://cb-example/travel \
--scope Inventory \
--collection Transportmydoc LCB_ERR_AUTHENTICATION_FAILURE (206)
Ref: Context:We can observe that Alice was unable to read data, and an authentication failure error was returned.
Now, let’s try the same thing with Bob.
cbc create -u bob -P password mydoc -V '{"key":"value"}' -M upsert -U couchbase://cb-example/travel \
--scope Inventory \
--collection Transportmydoc LCB_ERR_AUTHENTICATION_FAILURE (206)
Ref:We can see that Bob was unable to write the data and received an authentication failure error in this example. Let’s see whether Bob can read the data or not.
cbc get mydoc -u bob -P password -U couchbase://cb-example/travel \
--scope Inventory \
--collection Transportmydoc CAS=0x16d48f429afe0000, Flags=0x0, Size=15, Datatype=0x01(JSON)
{"key":"value"}Bob was able to read the data, as can be seen from the above example.
Let’s try with user Bob first, and use the cbc CLI tool to create a document in Couchbase.
cbc create -u bob -P password bobdoc -V '{"key":"value"}' -M upsert -U couchbase://cb-example/travel \
--scope Inventory \
--collection Hotelbobdoc Stored. CAS=0x16d4905332b90000
SYNCTOKEN=947,114707412110497,4We can see from the above example that Bob was able to write the data. Let’s see whether Bob can read the data or not.
cbc get bobdoc -u bob -P password -U couchbase://cb-example/travel \
--scope Inventory \
--collection Hotelbobdoc LCB_ERR_AUTHENTICATION_FAILURE (206)
Ref: Context:We can observe that Bob was unable to read data, and an authentication failure error was returned. Now, let’s try the same thing with Alice.
cbc create -u alice -P password alicedoc -V '{"key":"value"}' -M upsert -U couchbase://cb-example/travel \
--scope Inventory \
--collection Hotelalicedoc LCB_ERR_AUTHENTICATION_FAILURE (206)
Ref:We can see that Alice was unable to write the data and received an authentication failure error in this example. Let’s see whether Alice can read the data or not.
cbc get bobdoc -u alice -P password -U couchbase://cb-example/travel \
--scope Inventory \
--collection Hotelbobdoc CAS=0x16d4905332b90000, Flags=0x0, Size=15, Datatype=0x01(JSON)
{"key":"value"}Alice was able to read the data, as can be seen from the above example.
This confirms that Alice can write data to the Transport collection and read data from the Hotel collection.
Bob can write data to the Hotel collection and read data from the Transport collection.