Restore a Backup
A backup can be restored onto the same cluster that it was created on, or it can be restored onto another cluster.
Use the procedures on this page to restore data from a bucket backup. If you would like to create and manage buckets, see Manage Backups. To learn more about how backups work in Couchbase Capella, see Backup and Restore Cluster Data.
Prerequisites
|
Permissions Required
To view and restore bucket data from a backup, the following permissions are required:
|
-
The source cluster that created the bucket backup must still exist.
-
Backups can only be restored to a cluster running the same major version (or higher) than the source cluster that created the backup.
-
Data can only be restored to an existing bucket with the same name and conflict resolution methods as the bucket from the backup. If a bucket of the same name does not yet exist on the target cluster, you can complete a restore by choosing to automatically create the missing bucket.
Any conflicts that occur during the restore will be resolved automatically using the conflict resolution method configured for the buckets. This means that if a key-value pair in the target bucket is newer than the one in the backup, then the one from the backup is not restored unless otherwise specified in the restore settings.
Restore a Bucket
Restoring data from bucket backups should only be considered in worst-case scenarios. Other methods of recovery, such as XDCR replication from a redundant cluster, should be considered the first lines of recovery.
-
Go to the Backups tab of the source cluster that created the backup that you wish to restore.
-
Go to the Clusters tab in the main navigation.
-
Find and click on the source cluster.
This action opens the cluster with its Metrics tab selected.
-
Click the Backups tab.
This action shows the Latest Backups Per Bucket list.
-
-
You have the option of restoring the latest backup or an earlier backup.
- Restore the latest backup
-
-
In the Latest Backups Per Bucket list, find the bucket with the backup that you want to restore and click the More options icon on the right side of that bucket.
-
Click Restore Latest Backup.
-
- Restore an earlier backup
-
-
In the Latest Backups Per Bucket list, click the name of the bucket that you want to restore.
-
A list of backups for the current bucket based on the selected date is shown. Click the More options icon on the right side of the backup that you want to restore.
Clicking the calendar icon will produce a date picker that allows you to select a previous date when a backup cycle or on-demand backup occurred. -
Click Restore Backup.
-
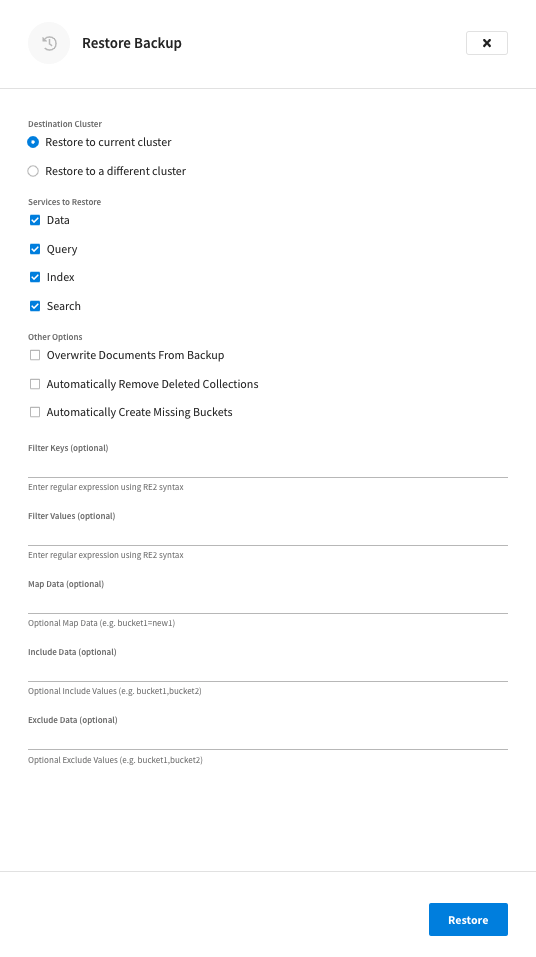
Either option opens the Restore Backup fly-out menu.
-
Specify the Destination Cluster.
The restore location can be the current cluster (chosen by default) or a different cluster in your organization. If you choose the Restore to a different cluster option, the Choose Cluster drop-down menu becomes available.
-
(Restore to a different cluster only) Use the Cluster dropdown menu to select the cluster that is to be the destination of the restore. Only clusters that are located in the same organization are listed in the dropdown menu.
-
-
Choose the Services to Restore.
-
(Optional) Apply Other Options.
-
Overwrite Documents From Backup
When enabled, this option will overwrite later versions of documents with earlier versions from the backup. This option is disabled by default.
-
Automatically Remove Deleted Collections
When enabled, this option will remove empty collections from the restore. This option is disabled by default.
-
Automatically Create Missing Buckets
This option is useful if you’re restoring a deleted bucket. If you leave this option disabled and try to restore a backup for a bucket that no longer exists, the restore process will fail. This option is disabled by default.
-
Filter Keys
Use this field to enter a regular expression (RE2) to filter keys. This allows you to specifically restore only a portion of your dataset from the backup.
-
Filter Values
Use this field to enter a regular expression (RE2) to filter values. This allows you to specifically restore only a portion of your dataset from the backup.
-
Map Data
This field allows you to map data from the backup to differently named data containers on the cluster. For example, buckets can be remapped to other buckets (
bucket=newbucket), scopes and collections to other scopes and collections in the same bucket (bucket.scope=bucket.newscopeorbucket.scope.collection=bucket.scope.newcollection). Note that map sources can only be specified once and cannot overlap. -
Include Data
Use this field to define only those buckets, scopes, or collections that you want to include from the restore. When items are added to this field, only those data containers will be restored and nothing else. Includes are defined as follows:
bucket,bucket.scope, andbucket.scope.collection.As buckets can contain periods, they must be escaped: my\.bucket.my-scope.Note that included data can only be specified once and cannot overlap (e.g.
bucket1andbucket1.scope1). -
Exclude Data
Use this field to define any buckets, scopes, or collections that you want to exclude from the restore. When items are added to this field, all data containers will be restored except for those that are specified. Excludes are defined as follows:
bucket,bucket.scope, andbucket.scope.collection.
-
-
Once you’re ready to initiate the restore, click Restore.
There can be a delay while the restore is scheduled before the restore process takes place. Once the process starts, the status of the operation is shown in a jobs panel that will appear near the top of the cluster page. Corresponding events are also added to the Activity Explorer.
Restore Indexes
|
Permissions Required
To access indexes in the Couchbase Capella UI, the following roles are required:
|
If GSI indexes were included in the bucket that you restored, they are automatically restored in a round-robin fashion among the current nodes running the Index Service. However, these indexes will only be created, not built.
The reason that indexes are created and not built is that Couchbase Capella does not know the optimal index topology ahead of time. By not building the indexes, it gives you the option to manually move each index between nodes and build them yourself. However, if you find the automatic index distribution acceptable, you can use the Capella UI to rebuild each index.
- To Rebuild an Automatically-Restored GSI Index
-
-
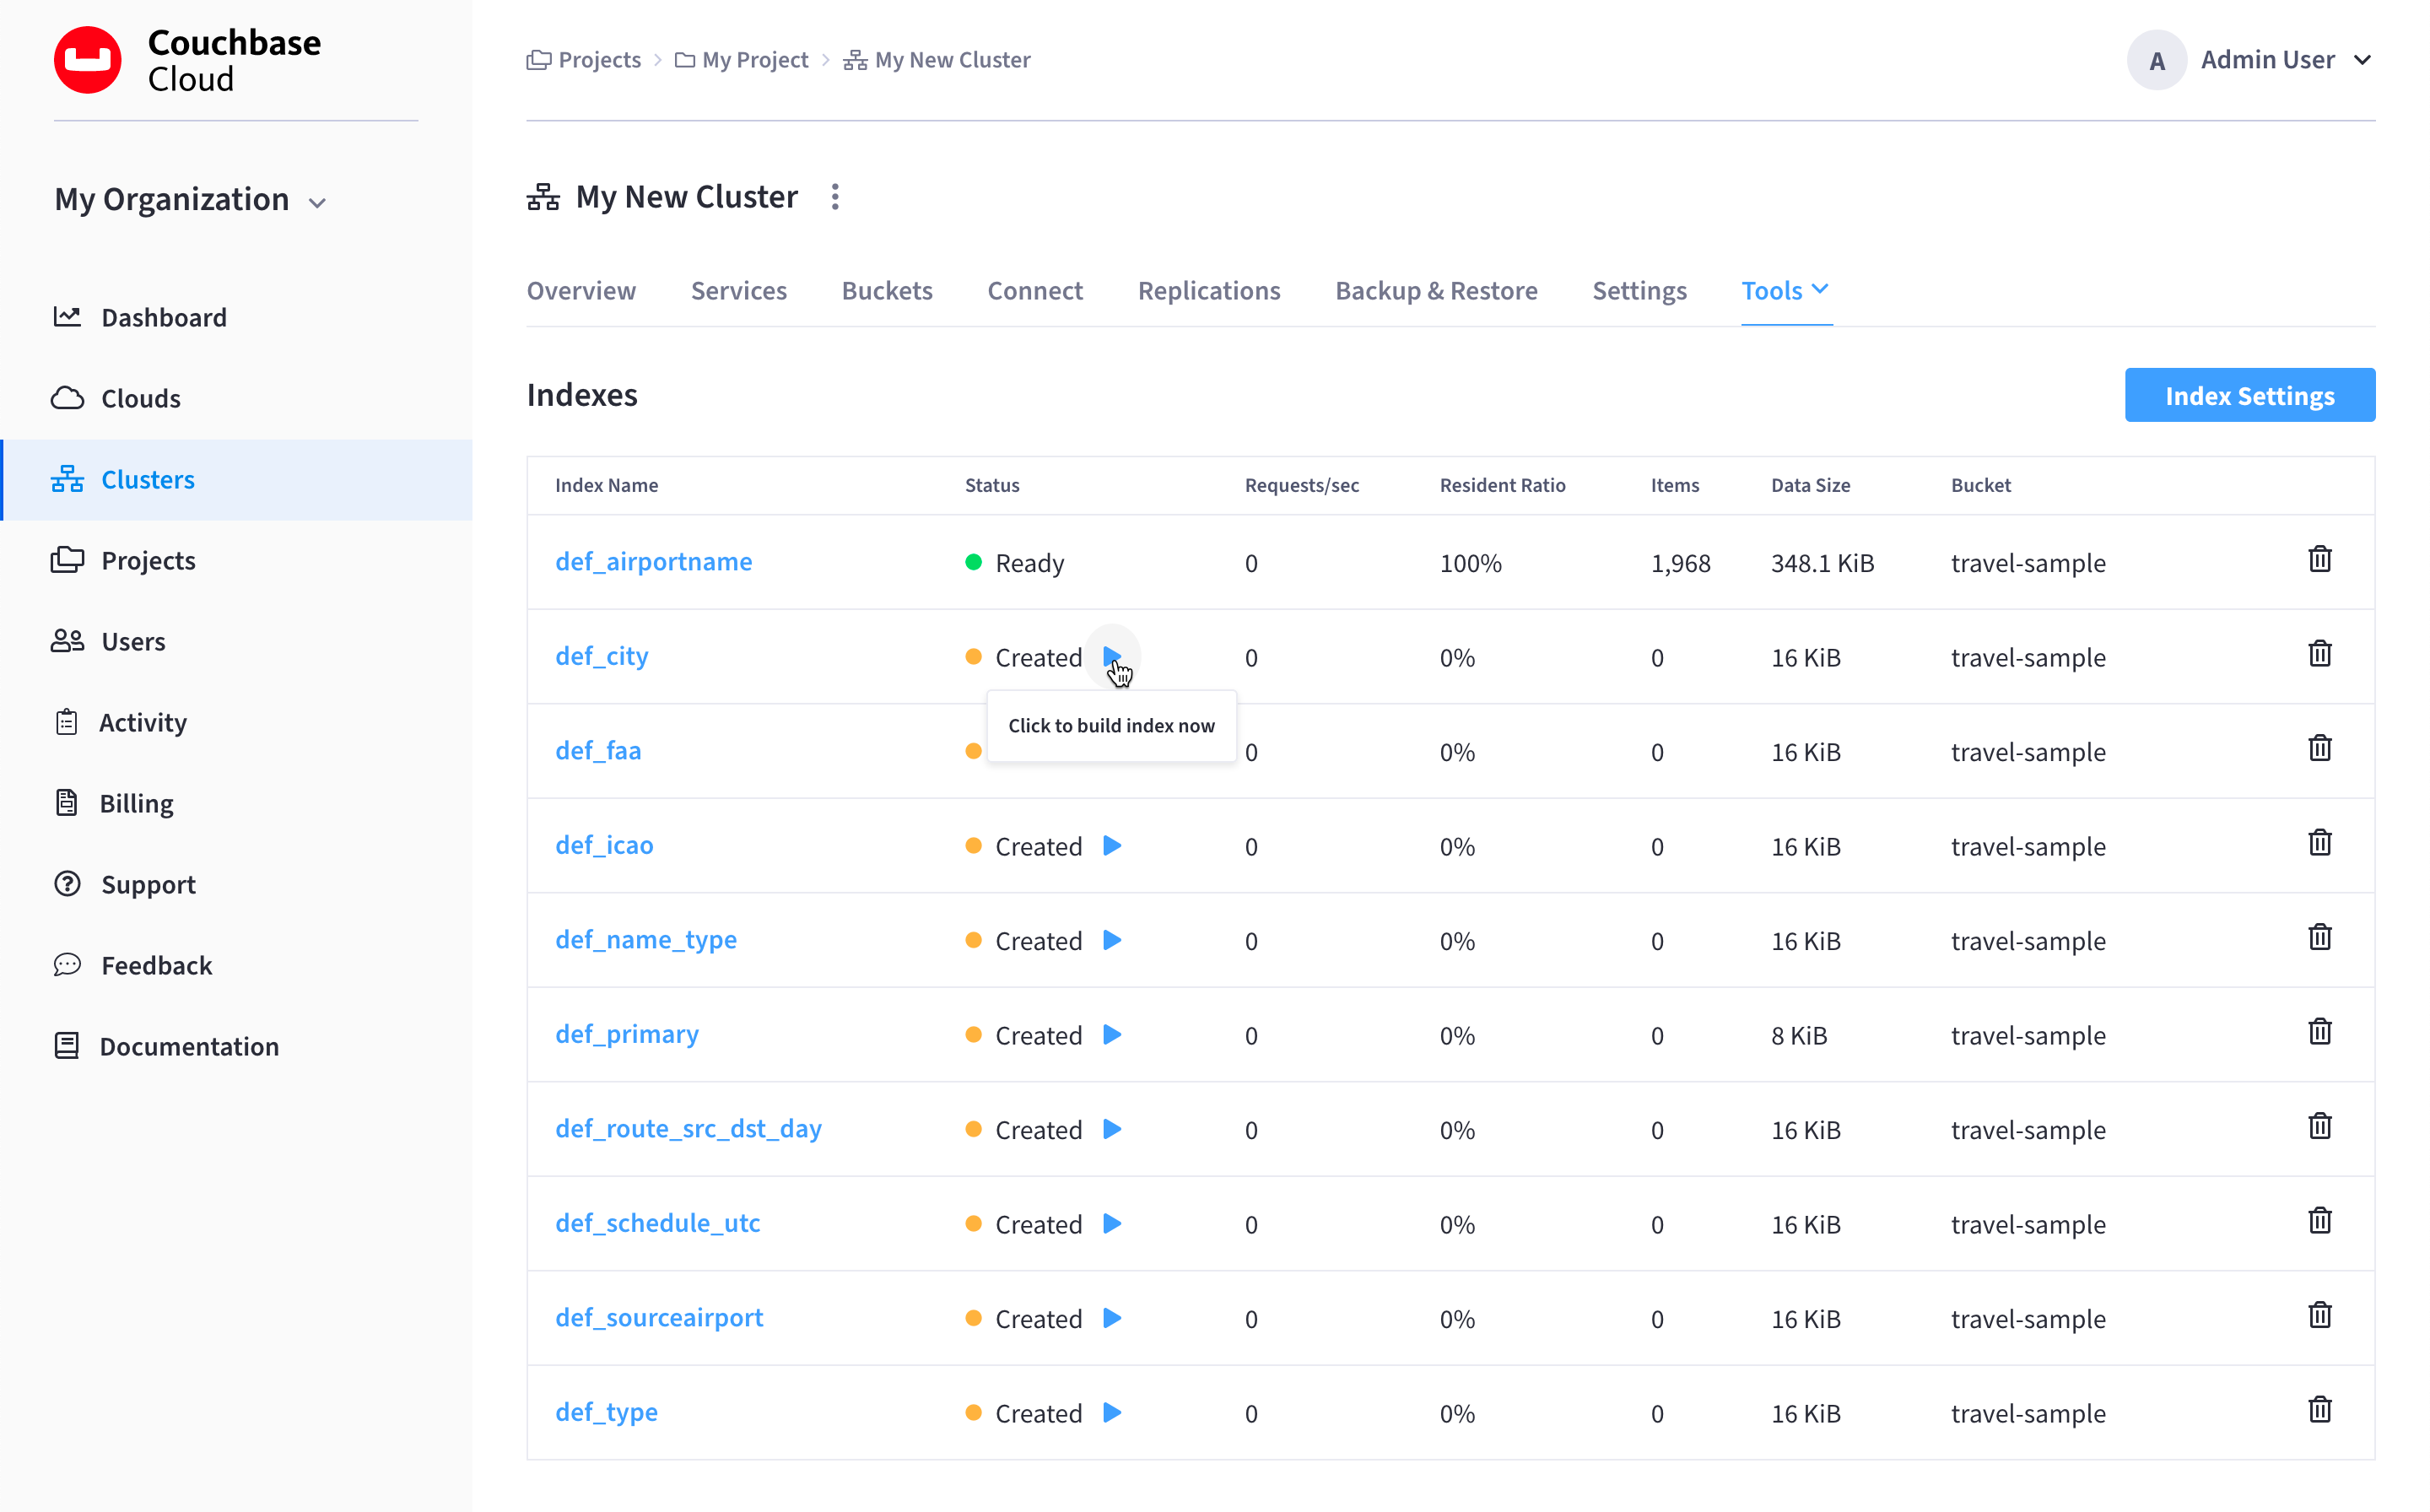
Go to the cluster’s Tools > Indexes tab.
-
Go to the Clusters tab in the main navigation.
-
Find and click on the cluster on which you restored a backup.
This opens the cluster with its Metrics tab selected.
-
Click the Tools > Indexes tab.
-
-
Each index that was restored will display a status of Created. Click the Play icon in the Status column for each index that you wish to rebuild.
Each index that you build will display the Ready status when the process is complete.
-
Restore a Backup in Own VPC
|
This information is for anyone still using Couchbase Server 6.6, hosted in their own cloud provider’s VPC. It does not apply to Couchbase 7.0, hosted in Couchbase’s VPC and fully managed for you. For further information contact Couchbase. The easiest way to get started with Capella, our fully managed DBaaS, is hosting in Couchbase’s Cloud. |
Guidelines and Limitations
-
The source cluster that originally created the backup must still exist and be accessible within the Capella UI.
Although backups are preserved in the connected cloud even after a cluster is deleted, the only user-accessible method for restoring a backup requires that you be able to access the source cluster’s Backup & Restore tab.
If you need to restore a backup from a cluster that is no longer available in the Capella UI (such as after an accidental cluster deletion), please contact Couchbase Capella Support for assistance. In the meantime, it is highly recommended that you download the backup from cloud storage so as to ensure it is not deleted as part of the cluster’s retention policy.
-
For customers hosting Capella in their own cloud provider’s VPC, a backup can only be restored to a cluster that is deployed in the same connected cloud as the source cluster that created the backup.
-
Backups can only be restored to a cluster that is running the same major version (or higher) than the source cluster that originally created the backup.
-
Data can only be restored to buckets that have the same names and conflict resolution methods as the buckets from the backup. Ensure that you’ve configured buckets on the target cluster that have the same names and conflict resolution methods as the ones you are trying to restore data from. If a bucket of the same name does not exist on the target cluster, no data from that bucket will be restored from the backup.
Any conflicts that occur during the restore will be resolved automatically using the conflict resolution method configured for the buckets. This means that if a key-value pair in the target bucket is newer than the one in the backup, then the one from the backup is not restored.
If the goal of the restore is to overwrite the current data with the data from the backup, it is recommended that you restore the data to a brand new bucket of the same name on another cluster. That way, all data will be restored in the state that it is in the backup. From there you can copy the data over to the desired bucket as you see fit.
-
When restoring from a Series backup, data will be restored from the latest Incremental backup in the series. The restore process will take into account any failovers that may have occurred in between the time that the backups were originally taken. If a failover did occur in between the backups, and the backup archive contains data that no longer exists in the cluster, then the data that no longer exists will be skipped during the restore. If no failovers occurred in between backups, then restoring a Series backup will restore all data from the series.
-
Restoring cluster backups is supported during rebalances and failovers. If a rebalance is in progress, the restore process will track any data movement around the cluster and ensure that data is restored to the appropriate node. If a failover occurs during restore, the restore process will recover so long as the failed node is removed from the cluster within three minutes. If the failed node is not removed, then the restore will fail.
Restore Bucket Data
|
Permissions Required
To restore bucket data from a backup, the following permissions are required:
|
-
Go to the Backup & Restore tab of the source cluster that created the backup that you wish to restore.
-
Go to the Clusters tab in the main navigation.
-
Find and click on the source cluster.
This opens the cluster with its Overview tab selected.
-
Click the Backup & Restore tab.
-
-
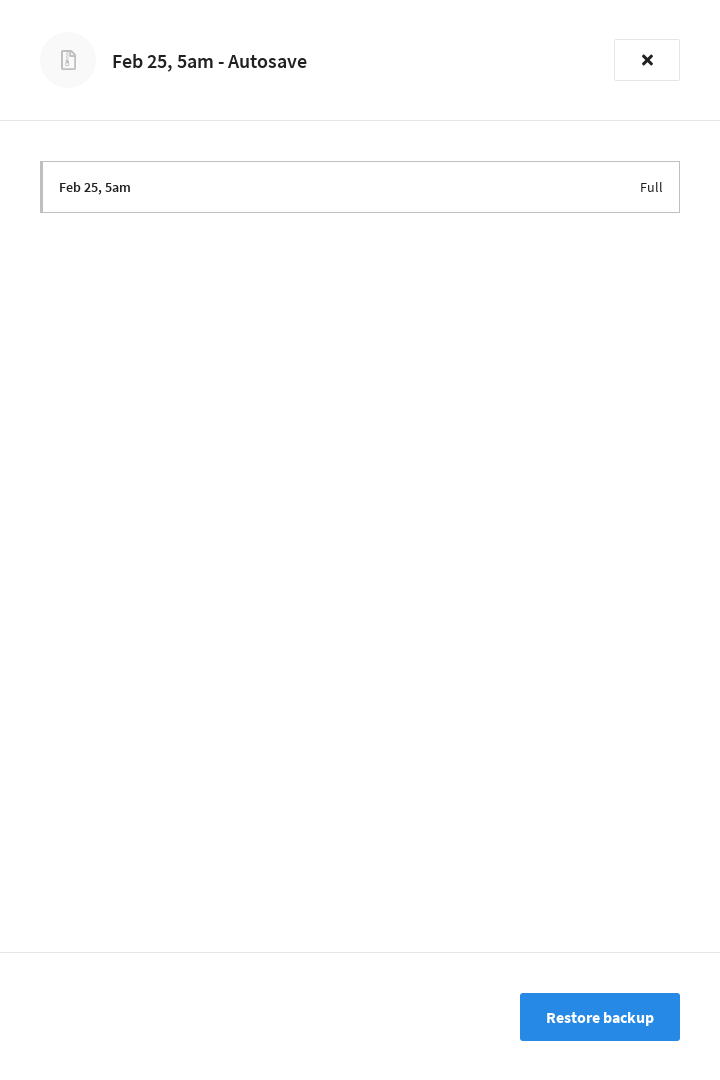
In the Backups list, find and click on the backup that you wish to restore.
This opens the backup’s fly-out menu.
-
Click Restore backup.
-
Specify the Restore Location.
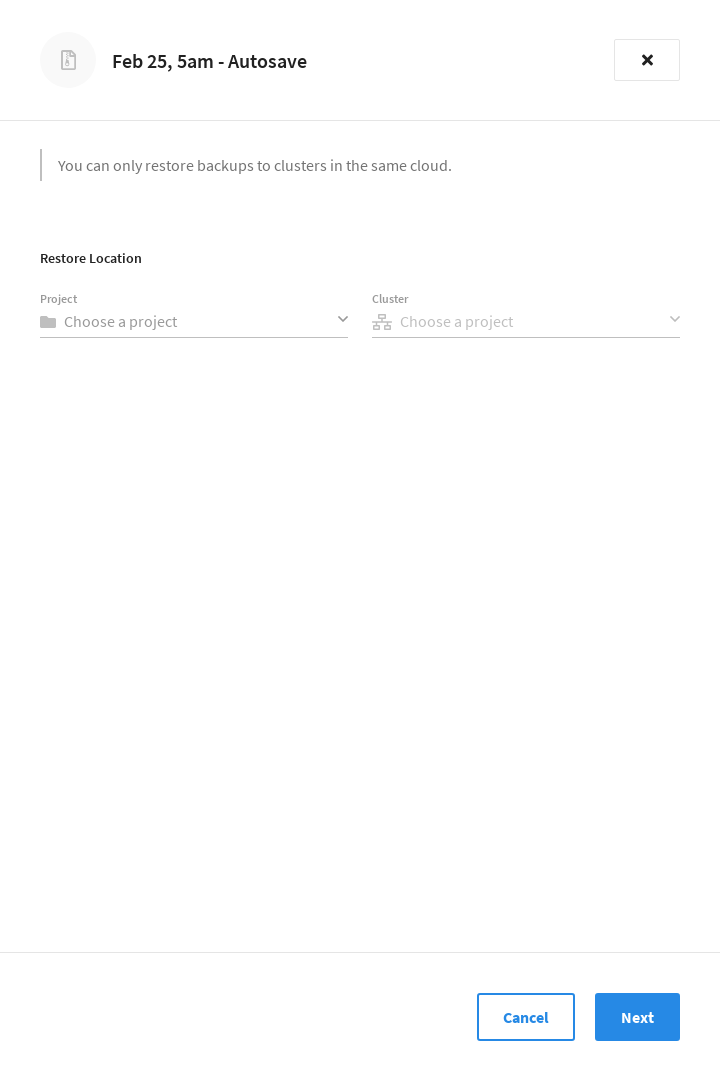
The restore location is the cluster that you wish to restore the backup to. This can be the same cluster that created the backup, or it can be another cluster in the same connected cloud.
-
Use the Project dropdown menu to select the project that contains the cluster that is to be the destination of the restore.
-
Use the Cluster dropdown menu to select the cluster that is to be the destination of the restore. Only clusters that are located in the same connected cloud appear in the dropdown menu.
Once you’ve selected the cluster, click Next.
-
-
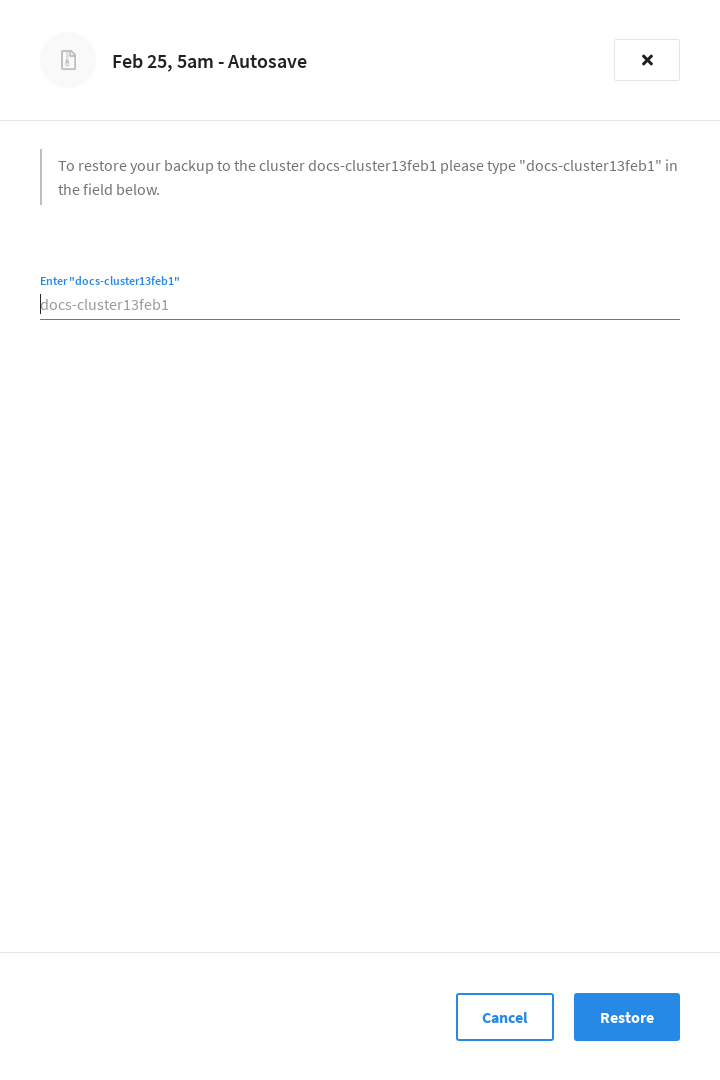
To confirm that you’re restoring to the desired cluster, enter the name of the destination cluster.
-
Once you’re ready, click Restore to begin restoring the backup.
Note that there can be a slight delay while the restore is scheduled, after which the fly-out will close.
Restoring Indexes
If GSI indexes were included in the bucket that you restored, they are automatically restored in a round-robin fashion among the current nodes running the Index Service. However, these indexes will only be created, not built.
The reason that indexes are created and not built is because Couchbase Capella does not know the optimal index topology ahead of time. By not building the indexes, it gives you the option to manually move each index between nodes and build them yourself.
However, if you find the automatic index distribution acceptable, you can use the Capella UI to rebuild each index.
|
Permissions Required
In order to access indexes in the Couchbase Capella UI, the following roles are required:
|
-
Go to the cluster’s Tools > Indexes tab.
-
Go to the Clusters tab in the main navigation.
-
Find and click on the cluster on which you restored a backup.
This opens the cluster with its Overview tab selected.
-
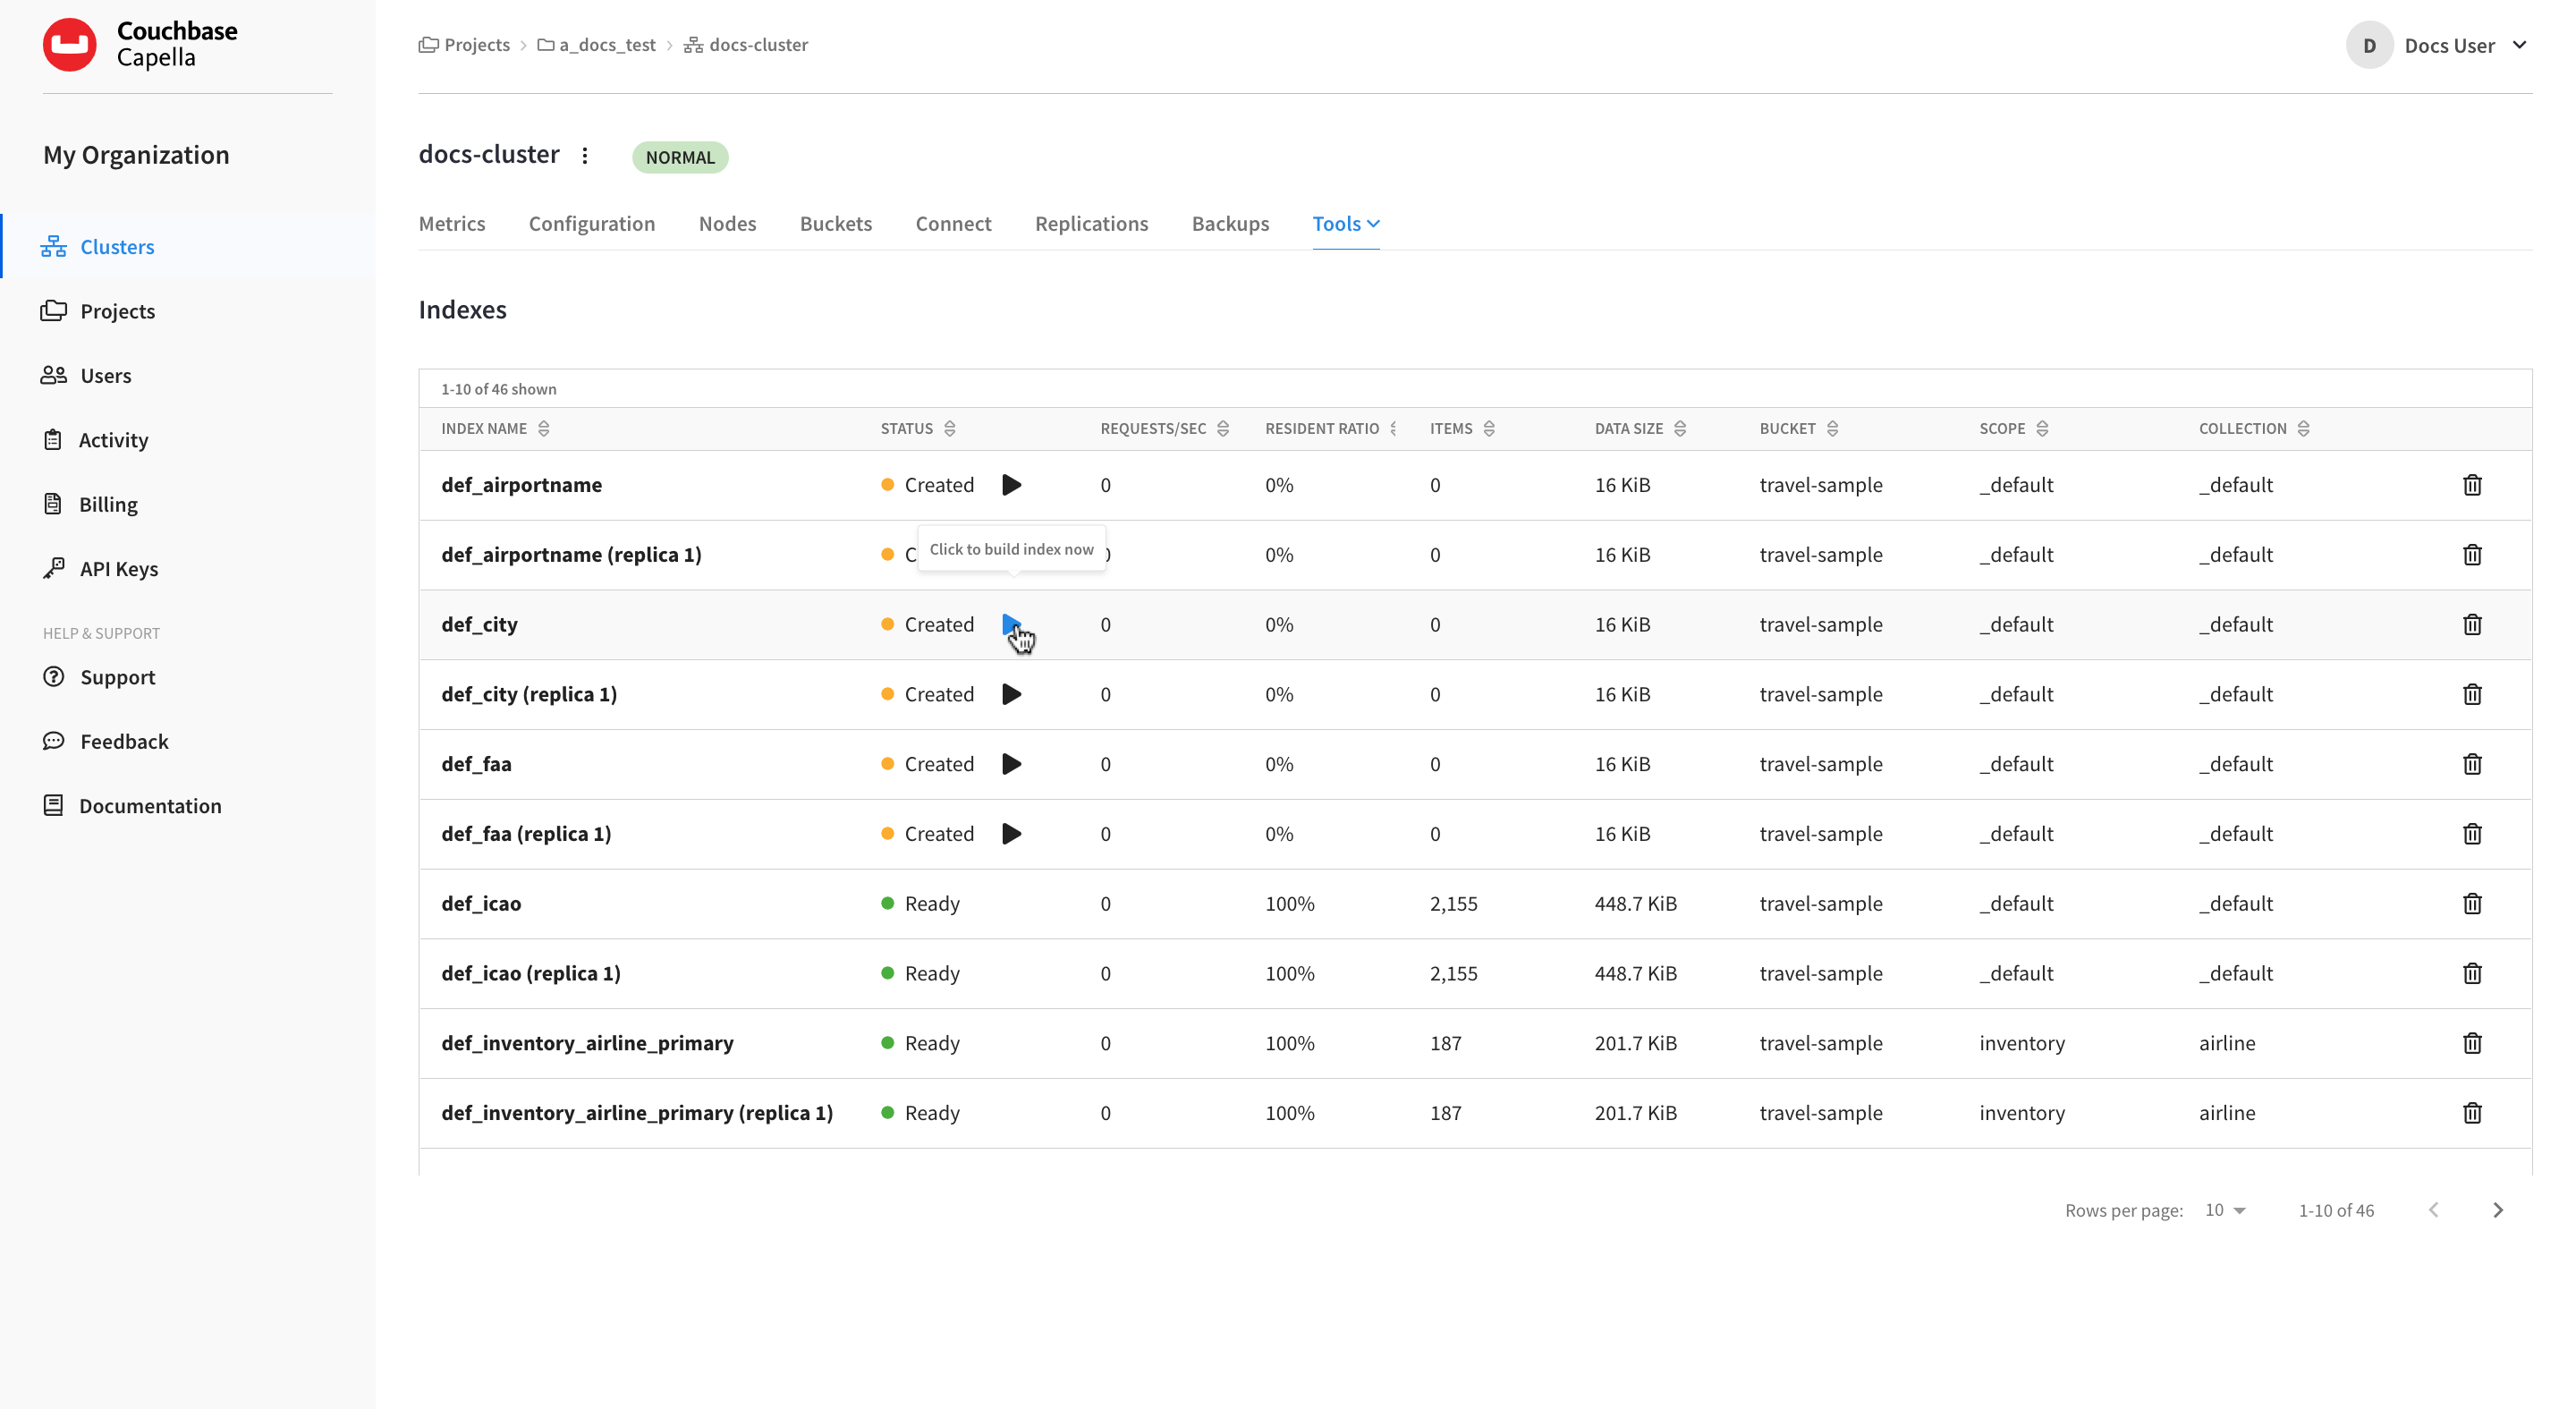
Click the Tools > Indexes tab.
-
-
Each index that was restored will display a status of Created. Click the Play icon in the Status column for each index that you wish to rebuild.